Boat Battery Buying Guide for a Reliable Power Source

Welcome to my comprehensive boat battery buying guide. As an expert in the field, I will provide you with valuable insights and tips on how to choose the right boat battery for your specific needs.

boat-battery-buying-guide.jpg

Your Boat’s Batteries Are Expensive ! This Marine Battery Maintenance Guide WILL Save You Time and Money

Having a reliable power source is crucial for a smooth boating experience. Whether you’re planning a day trip or a long adventure on the water, a high-quality battery is essential.

With so many options available, selecting the right one can be overwhelming. That’s why I’ve put together this boat battery buying guide to help you make an informed decision.

Boat Battery Buying Guide – Key Takeaways:

  • Choosing the right boat battery is essential for optimal performance and a smooth boating experience.
  • Consider factors such as battery type, capacity, and maintenance requirements when making your selection.
  • Proper maintenance can significantly extend the lifespan of your battery.
  • Matching the battery to your boat’s electrical system is crucial.
  • The size and weight of the battery can impact installation and boat balance.

Factors to Consider When Choosing a Boat Battery

Choosing the right boat battery is an essential step in ensuring optimal performance for your boat. Here are some key factors to consider:

Battery Type

The first factor to consider when choosing a boat battery is the type. There are three main types of boat batteries: lead-acid, AGM, and lithium-ion. Each type has its own advantages and disadvantages, so it’s important to select the one that best suits your needs and preferences.

Battery Type Advantages Disadvantages
Lead-Acid Low cost, readily available Requires maintenance, can’t discharge below 50%
AGM No maintenance, can’t spill, can discharge deeply More expensive, heavier
Lithium-Ion Lightweight, long lifespan, can discharge deeply Expensive, requires special charging conditions

As shown in the table, each type of battery has its pros and cons. Lead-acid is great for those on a budget, while AGM is a solid choice for boaters who don’t want to deal with maintenance. Lithium-ion is the most expensive option but offers the longest lifespan and can discharge deeply.

Battery Capacity

Another key factor is battery capacity, which is measured in amp-hours (Ah). The capacity you need depends on your boating activities and the electrical devices you plan to power. As a general rule, it’s best to choose a battery with a higher capacity than you think you’ll need to avoid running out of power. Keep in mind that certain devices, such as refrigerators and air conditioning units, require a higher capacity battery to run for extended periods.

Maintenance Requirements

The maintenance requirements of a battery should also be considered. Lead-acid batteries require regular maintenance, such as checking the water level and adding water as needed. AGM batteries, on the other hand, require no maintenance and are sealed. Lithium-ion batteries have the lowest maintenance requirements, although they require specialized charging conditions.

Compatibility

Ensure that the battery you choose is compatible with your boat’s electrical system. Check the voltage requirements and ensure that the battery can meet them. Also, consider the reserve capacity, which measures the number of minutes a battery can sustain a load of 25 amps before dropping below 10.5 volts. A higher reserve capacity is generally better.

Size and Weight

The size and weight of the battery can also impact its installation and handling. Consider the available space in your boat and select a battery that fits comfortably. If your boat has a low weight capacity, consider a lighter battery to avoid affecting the balance of the boat.

It’s essential to choose the best boat battery for your needs to ensure optimal performance. By considering factors such as battery type, capacity, maintenance requirements, and compatibility, you can select a reliable and efficient power source for your boat.

Different Types of Boat Batteries

Choosing the right boat battery depends on various factors such as type, capacity, and maintenance. Boat batteries come in different types, including lead-acid, AGM, and lithium-ion. Each type has its own features and benefits, making it essential to understand which one is best for your needs.

Lead-Acid Batteries

Lead-acid batteries are the most traditional type of marine battery, known for their affordability and durability. They have a low self-discharge rate and a long lifespan, making them an excellent choice for boaters looking for a reliable and cost-effective option. However, they are relatively heavy, require periodic maintenance, and are not maintenance-free.

AGM Batteries

AGM (absorbed glass mat) batteries are a type of sealed lead-acid battery that requires no maintenance. They have a higher power density than traditional lead-acid batteries, providing more power per pound of weight. AGM batteries are an excellent choice for boats with limited space and high power demands. They are also suitable for boaters who prefer maintenance-free batteries.

Lithium-ion Batteries

Lithium-ion batteries are becoming increasingly popular due to their high power density, low weight, and longer lifespan. They can provide more power per pound of weight than lead-acid batteries and have a higher charge acceptance rate. Lithium-ion batteries are an excellent choice for boaters looking for a lightweight and high-performance option. However, they are more expensive than other types of batteries.

Type of Battery Pros Cons
Lead-Acid Affordable, durable, low self-discharge rate, long lifespan Relatively heavy, requires periodic maintenance, not maintenance-free
AGM Sealed, maintenance-free, higher power density than lead-acid Higher cost than lead-acid
Lithium-ion High power density, low weight, longer lifespan More expensive than other types of batteries

When choosing the best boat battery for your needs, it’s important to consider the features of each type. If you’re looking for an affordable and durable option, a lead-acid battery may be the best choice. If you prefer a maintenance-free battery with a higher power density, an AGM battery may be the way to go. If you need a lightweight and high-performance battery, a lithium-ion battery may be the ideal choice.

Understanding Battery Capacity and Performance

When it comes to choosing the right boat battery, it’s crucial to consider the battery’s capacity and performance. Battery capacity refers to the amount of electrical energy the battery contains, while performance refers to the battery’s ability to deliver this energy efficiently and reliably over time.

Before selecting a boat battery, it’s important to determine the amount of power you’ll need based on your boat’s electrical requirements. This will help you calculate the minimum battery capacity you’ll need to ensure reliable power on the water.

One way to determine the battery capacity required for your boat is to use the following formula:

AH (amp-hours) = watts/volts x hours

This formula can help you calculate the number of amp-hours needed to power your boat’s electrical devices for a specific amount of time. By determining the amp-hour capacity required, you can choose a battery with sufficient capacity to meet your needs.

In addition to capacity, it’s also important to consider a battery’s performance. Factors that can affect battery performance include temperature, discharge rate, and depth of discharge. Choosing a battery with a high discharge rate and deep discharge capabilities can ensure that your battery delivers reliable performance even under heavy loads.

Another factor to consider is the battery’s reserve capacity, which refers to the amount of time the battery can deliver a specified level of power before it’s fully discharged. Higher reserve capacity can provide a safety net in case of unexpected power needs, making it an important consideration for boaters.

When choosing a boat battery, it’s important to select a battery that meets the capacity and performance requirements of your specific boating needs. By understanding these factors and determining your power needs, you can choose a battery that will provide reliable power and optimal performance on the water.

Boat Battery Buying Guide – Maintenance Tips 

Proper maintenance is crucial for extending the lifespan of your boat battery. Here are some essential maintenance tips to keep your battery in optimal condition:

  1. Charge your battery regularly: Regular charging helps prevent sulfation and extends battery life. Charge your boat battery after every use, and for extended periods of storage, charge your battery every 30 to 45 days.
  2. Check the water level: If you have a lead-acid battery, check the water level regularly and refill with distilled water as needed. Ensure that the battery plates are fully submerged in the water.
  3. Store your battery correctly: Store your battery in a cool, dry place away from direct sunlight and moisture. Ensure that your battery is fully charged before storage.
  4. Clean your battery: Clean the terminals and connections regularly to prevent corrosion. Use a wire brush or sandpaper to remove any buildup and apply a terminal protectant to prevent future corrosion.
  5. Inspect for damage: Check your battery for signs of damage, such as bulges, cracks, or leaks. If you notice any damage, replace your battery immediately.

Following these maintenance tips will help extend the life of your boat battery and ensure reliable power when you need it. With proper maintenance, you can increase your battery’s lifespan by up to 50%.

Selecting the Right Battery for Your Boat’s Electrical System

Choosing the right battery for your boat’s electrical system is crucial for optimal performance. When selecting a boat battery, consider the following battery selection tips:

  1. Voltage requirements: Ensure you choose a battery with the correct voltage to match your boat’s electrical system.
  2. Compatibility: Make sure the battery type is compatible with your boat’s charging system. For example, some boats may require a deep-cycle battery, while others may need a starter battery.
  3. Reserve capacity: This refers to the length of time the battery can continuously discharge a specific amount of current before needing a recharge. Consider how long you’ll be boating for and how much power you’ll need in reserve.

When selecting the best boat battery for your needs, it’s crucial to consider your specific boating activities. If you plan to run electronics or appliances that require a steady power source, a deep-cycle battery may be the best choice. On the other hand, if your primary usage involves starting the boat’s engine, a starter battery may be more suitable.

It’s also important to remember that the type of battery you choose will impact its overall lifespan and performance. By choosing a high-quality boat battery and following proper maintenance tips, you can ensure your battery provides reliable power for years to come.

“Choosing the right battery for your boat’s electrical system is crucial for optimal performance.”

Choosing the Right Battery Size and Weight

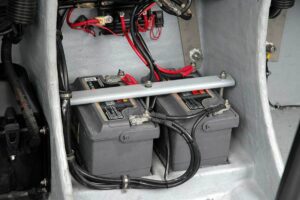
Before selecting a boat battery, it’s essential to determine the right size and weight. The size and weight of the battery can impact its installation, handling, and overall boat balance.

First, consider the available space on your boat and ensure that the battery fits comfortably and securely. You can check your boat’s specifications to ensure that the battery size and weight are within the recommended range.

Next, consider the weight of the battery. A heavy battery can affect your boat’s balance, stability, and performance. If your boat has a small engine or is used primarily for recreational purposes, a lighter battery may be more suitable.

Additionally, consider the battery’s shape and design. Some batteries may have unique shapes that allow for easier installation or better space utilization.

Choosing the right size and weight for your boat’s battery is crucial for optimal performance and safety. Be sure to consider the factors mentioned above and consult with a professional if needed

Considerations for Boat Battery Buying Guide in the US Sun

If you are boating in the United States, you need to consider the harsh weather conditions, high temperatures, and prolonged sun exposure that come with the territory. These factors can have a significant impact on your boat battery, so it’s important to choose the right one for your needs.

Battery Type

When boating in the US sun, it’s important to choose a battery that can handle high temperatures. AGM (Absorbed Glass Mat) batteries, for example, are a popular choice for their ability to withstand extreme temperatures better than other types. They are also maintenance-free and resistant to spills, making them a safe option for boaters.

Cold Cranking Amps (CCA)

Cold Cranking Amps (CCA) is a measure of the battery’s ability to start the engine in cold temperatures. When boating in the US sun, the battery might experience extreme temperature shifts, so it’s important to choose a battery with a high CCA rating. This ensures that your boat starts smoothly when you need it to.

Battery Capacity

When boating in the US sun, you need a battery with a high enough capacity to power all your electrical equipment. This includes items like navigation equipment, fish finders, and radios. Consider the amount of time you spend on the water and the amount of electrical equipment you use. Select a battery that has sufficient capacity to meet your needs.

Battery Size and Weight

The size and weight of your boat battery can impact the balance of your boat. When boating in the US sun, it’s important to choose a battery that fits in the available space and doesn’t add unnecessary weight to your boat. Consider the weight and size of the battery to ensure that it won’t affect performance or safety while boating.

By following these considerations, you can choose the best boat battery for your needs when boating in the United States. A high-quality battery will ensure that your boat functions optimally, providing you with a safe and enjoyable experience on the water.

Conclusion: Choosing the Best Boat Battery for Your Needs

As a boat owner, choosing the right battery is key to ensuring a safe and enjoyable experience on the water. This boat battery buying guide has provided you with a comprehensive understanding of the key factors to consider when selecting a battery, including battery type, capacity, performance, maintenance, and compatibility.

Boat Battery Selection Tips:

When selecting a boat battery, it is essential to choose one that meets your specific needs. To make the best decision, consider the type of battery that is most suitable for your boat, the required capacity, and maintenance demands. Assess the compatibility of your electrical system and strive to find a battery that fits your available space.

Boat Battery Maintenance Tips:

Proper maintenance is crucial for prolonging the lifespan of your boat battery. To ensure optimal performance, clean your battery regularly, charge it using a suitable charger, and store it correctly when not in use. Regular inspection of your boat battery can also help you detect any issues early on, allowing you to undertake corrective actions as required.

Boat Battery Lifespan and Performance:

Maximizing the lifespan and performance of your boat battery requires you to follow the right charging procedures, avoid overloading the battery, and minimize unnecessary usage. Consider investing in a high-quality battery that can provide optimal performance even in extreme conditions.

This comprehensive boat battery buying guide has provided valuable insights into the factors to consider when selecting a battery that meets your needs. Remember, choosing a battery that is compatible with your boat’s electrical system and usage demands is essential for a reliable power source on the water.

Now that you have a better understanding of boat batteries and what to consider when selecting one, you can confidently make an informed decision. By following the maintenance tips provided in this guide, you can also extend the lifespan of your battery, ensuring a reliable power supply throughout your boating adventures.

FAQ about Boat Battery Buying Guide

How do I choose the right boat battery?

Choosing the right boat battery involves considering factors such as battery type, capacity, maintenance requirements, and compatibility with your boat’s electrical system. This comprehensive guide provides expert advice to help you make an informed decision.

What factors should I consider when choosing a boat battery?

Factors to consider when choosing a boat battery include battery type, capacity, maintenance requirements, voltage requirements, compatibility with your boat’s electrical system, and the size and weight of the battery.

What are the different types of boat batteries?

Boat batteries come in various types, including lead-acid, AGM (absorbent glass mat), and lithium-ion batteries. Each type has its own advantages and disadvantages, which are discussed in this guide to help you make an informed decision.

How do I understand battery capacity and performance?

Understanding battery capacity involves determining the battery’s ampere-hour (AH) rating and considering your boating activities. Maximizing battery performance requires proper charging, maintenance, and usage practices. This guide provides insights into both these aspects.

What maintenance tips should I follow for boat batteries?

Proper maintenance is crucial for extending the lifespan of your boat battery. This section covers essential maintenance tips, including charging procedures, cleaning, and storage guidelines.

How do I select the right battery for my boat’s electrical system?

Selecting the right battery for your boat’s electrical system involves considering factors such as voltage requirements, compatibility, and reserve capacity. This section provides insights to help you choose the best battery for your specific needs.

How do I choose the right battery size and weight?

The size and weight of a boat battery can impact its installation, handling, and overall boat balance. This section discusses how to determine the appropriate battery size and weight based on your boat’s specifications and available space.

What should I consider for boating in the US sun?

Boating in the United States sun presents specific challenges. This section provides considerations for choosing a boat battery that can withstand harsh weather conditions, high temperatures, and prolonged sun exposure.

What is the conclusion of this boat battery buying guide?

Choosing the right boat battery is essential for a smooth and enjoyable boating experience. By considering the factors discussed in this guide, you can confidently select a battery that meets your needs, maximizes performance, and ensures reliable power on the water. Following the maintenance tips provided will help extend the lifespan of your battery.

Boat Maintenance and Service Schedule is Critical

Marine Battery Buying Guide

MarineBatteryGuide.com is a participant in the Amazon Services LLC Associates Program, an affiliate advertising program designed to provide a means for sites to earn advertising fees by advertising and linking to Amazon.com,

Links on this boat battery buying guide page are sponsored affiliate links and the owner makes commission if you buy after clicking these links. The owner is not a bona-fide user of the boat battery buying guide. However, he has thoroughly researched the boat battery buying guide and provided a personal opinion only. This disclosure is in accordance with the Federal Trade Commission’s 16 CFR, Part 255: “Guides Concerning the Use of Endorsements and Testimonials in Advertising.”

Understanding your Marine Battery Capacity
Optimize Your Electrical System

As a boater, understanding your marine battery capacity is crucial for optimizing your vessel’s electrical system and ensuring a smooth sailing experience. Your marine battery size and capacity are determining factors for powering your boat’s electrical components, such as lights, navigation systems, and electronics.

However, determining the appropriate marine battery capacity can be challenging, as it depends on several factors. By following this guide, you will gain key insights and recommendations for optimizing your boat’s power capabilities.

From how to determine marine battery capacity to increasing boat battery capacity, we’ll cover it all.


Marine Battery Capacity – Key Takeaways:

  • Understanding your boat battery capacity is crucial for optimizing your boat’s electrical system.
  • Marine battery size and capacity are determining factors for powering your boat’s electrical components.
  • Determining the appropriate boat battery capacity depends on several factors, including usage patterns and environmental conditions.
  • Solutions for increasing boat battery capacity include upgrading to a higher capacity battery or adding parallel batteries.
  • Optimizing your boat battery capacity is essential for maximizing the efficiency and lifespan of your battery.


marine-battery-capacity.jpgIt is important to ensure that you have adequate capacity in the battery for the amount of power your application will use (known as Amp Hours). The following battery calculation sheet guide is a great place to start.

By establishing the power consumption of each piece of equipment (usually marked in Watts on the information label of your equipment)…taking into account the number of hours you will utilize the battery power between recharges, and the Voltage of the system you can calculate the Amp Hours that you require.

Battery Calculations

Now that you have calculated the total watt hours for your requirements…divide the total Watt-Hours by the Voltage to obtain the Amp Hours.

498 Watt Hours ÷ 12 Volts = 41.5 Amp Hours

As a rule of Thumb, and because DC electrical systems are not always perfect, one more very important calculation that we suggest.

We strongly recommend that you allow a little extra power in reserve. Add a safety margin of 30% to your calculation just be safe.

41.5 + 30% Safety Margin (12.45) = 53.95 Total Amp Hours

Now you can purchase the correct Deep Cycle battery for your needs.

The Basics of Marine Battery Capacity

As a boat owner, understanding your boat battery capacity is crucial for ensuring reliable and efficient power while out on the water. Your marine battery size plays a critical role in providing the necessary electrical power to run everything from lights and electronics to your boat’s engine.

The capacity of a boat battery refers to the total amount of electrical charge it can store and deliver. This capacity is measured in ampere-hours (Ah) and is typically listed on the battery label. The higher the Ah rating, the longer the battery can provide power before needing to be recharged.

Marine battery size is closely related to battery capacity. Typically, larger batteries have a higher capacity and can deliver more power over a longer period of time. However, it is essential to choose a battery that is compatible with your boat’s electrical system and usage patterns.

Determining Your Marine Battery Capacity

Determining the appropriate boat battery capacity for your vessel is crucial for ensuring reliable and efficient power systems. A good starting point for determining the battery capacity is to evaluate your boat’s electrical needs. Consider all the devices and systems on your boat that require power, such as the navigation system, lights, refrigerator, and pumps.

One way to determine your boat battery capacity is to use a marine battery capacity calculator. This tool takes into account the various electrical devices on your boat and their average power usage to determine the appropriate battery capacity required for your boat. You’ll need to provide information such as the total power rating of each device, the amount of time each device is used, and the number of days you plan to be on the water without shore power.

Once you have calculated the minimum battery capacity needed, you may want to consider adding additional capacity. This can provide a safety margin and ensure that your battery won’t run out of power unexpectedly. Additionally, larger battery banks can reduce the amount of time the batteries need to be recharged, which can extend their lifespan.

It’s important to note that there are limitations to how much battery capacity you can add to your boat due to space and weight constraints. Consult your boat’s manual or a marine electrician to determine the maximum battery capacity your boat can handle.

In summary, determining your boat battery capacity requires consideration of all the electrical devices on your boat and their power usage. A marine battery capacity calculator can aid in this process, and adding additional capacity beyond the minimum requirements can provide a safety margin. Consult with a professional to ensure you don’t exceed the maximum battery capacity for your boat.

“An accurate calculation of your boat’s electrical needs is critical for determining the correct battery capacity.”

Factors Affecting Marine Battery Capacity

When it comes to choosing the best boat battery capacity, it’s important to consider a range of factors that can impact your battery’s performance. Here are some of the key factors that you should keep in mind:

Battery Type

The type of battery you choose can significantly affect its capacity. For example, deep-cycle batteries are designed to discharge more slowly over a longer period, making them ideal for boats that require consistent power over an extended time. Lithium-ion batteries, on the other hand, are a more expensive option but offer higher capacity and faster charging times.

Usage Patterns

The way you use your boat’s electrical systems will also impact the ideal battery capacity. If you have numerous power-hungry devices on board, such as a fridge or air conditioning, you will require a higher capacity battery. Similarly, if you spend long periods at anchor, a higher capacity battery will be necessary to keep your systems running.

Environmental Conditions

The temperature and humidity levels in your boating environment can also affect battery capacity. High temperatures can cause batteries to discharge faster, while extreme cold can reduce capacity and even damage the battery. It’s essential to choose a battery that can withstand the environmental conditions of your boating area, such as a marine battery with sealed construction to protect it from moisture.

Charging System

Your boat’s charging system is also a key factor in determining the battery capacity you need. If your boat has a high-output alternator or solar panels that can charge your battery quickly, you may be able to get away with a lower capacity battery. However, if your charging system is limited, you’ll need a higher capacity battery to ensure you have enough power for your needs.

Battery Age and Maintenance

The age of your battery and how well you maintain it can also impact its capacity over time. Regular maintenance, such as checking the water levels or cleaning the terminals, can help extend the life of your battery and maintain its capacity. However, if your battery is old or poorly maintained, it may not provide the full capacity you require.

Considering these factors can help you choose the best boat battery capacity for your specific needs, ensuring that you have a reliable and efficient electrical system while out on the water.

Meeting Boat Battery Capacity Requirements

One of the most critical aspects of managing your boat battery capacity is meeting the specific requirements based on your boat’s electrical demands. The capacity requirements are determined by the electrical loads that your boat needs to power, which can vary depending on the type of equipment you have onboard.

To determine your boat’s capacity requirements, you need to calculate the total power consumption of all your electrical equipment and appliances. Once you have this number, you can then choose the best boat battery capacity that meets your needs.

If you’re unsure how to calculate your boat’s power consumption, you can consult the manufacturer’s specifications or seek advice from a marine electrician.

Best Boat Battery Capacity

The best boat battery capacity for your boat depends on several factors, including your boat’s size, the number of electrical loads, and your boating habits. It’s essential to choose a battery that can provide sufficient power to meet your needs and ensure reliable performance.

For most boats, a battery capacity of at least 200 amp-hours is recommended. However, larger boats with high electrical demands may require a battery capacity of 400 amp-hours or more.

Remember that choosing the right battery capacity is crucial for maintaining a reliable electrical system on your boat. If you’re unsure about the best boat battery capacity for your boat, it’s always best to seek advice from a professional.

Increasing Boat Battery Capacity

If you find that your current boat battery capacity is insufficient, don’t worry. There are several strategies you can employ to increase it and ensure your electrical systems operate smoothly throughout your boating adventures.

One option is to upgrade to a higher capacity battery. This will provide your boat with more power and enable you to run more devices for longer periods of time. However, make sure to choose a battery that fits your boat’s size and electrical requirements, as selecting the wrong battery can lead to poor performance and potential safety hazards.

Another way to boost your boat’s power capabilities is to add parallel batteries. This involves connecting multiple batteries together to increase the overall capacity. However, keep in mind that this method requires careful wiring and monitoring to prevent overloading or damaging the batteries.

It’s also important to consider your charging system when increasing your boat battery capacity. Upgrading to a higher-output alternator or adding a solar panel may be necessary to keep your batteries properly charged and functioning at their maximum capacity.

Ultimately, the best approach to increasing your boat battery capacity will depend on your specific needs and preferences. Consulting with a marine electrician or boat dealer can help you make an informed decision and ensure a safe and reliable electrical system on your boat.

“Upgrading to a higher capacity battery will provide your boat with more power and enable you to run more devices for longer periods of time.”

Optimizing Boat Battery Capacity

Now that we have discussed different factors that can impact your boat battery capacity and how to determine the best boat battery capacity for your specific needs, let’s talk about how to optimize your boat battery capacity once you have it installed.

One of the key ways to optimize your boat battery capacity is to conserve battery power. This means being mindful of your energy usage and taking steps to minimize it where possible. Here are a few tips:

  • Minimize the use of high-energy devices like stereos and live wells
  • Turn off electronics when they’re not in use
  • Use LED lighting instead of traditional incandescent bulbs

By keeping your energy usage as low as possible, you can maximize the lifespan of your battery and extend the time between charges.

Another way to optimize your boat battery capacity is to manage your electrical systems effectively. For example, you can:

  • Check your battery connections regularly to ensure they’re clean and tight
  • Inspect your battery and charging system for signs of wear or damage
  • Make sure your battery charger is appropriate for your battery and is functioning correctly

By maintaining your electrical systems and ensuring they’re working properly, you can improve the efficiency of your boat’s power usage and reduce strain on your battery.

Finally, you can also optimize your boat battery capacity by making the most of the power you have available. One way to do this is to use battery monitors and other tools that allow you to track and manage your power consumption in real-time.


With a detailed understanding of your boat battery capacity and how to optimize it, you can enjoy worry-free boating experiences and get the most out of your marine battery.

Understanding Boat Battery Capacity Charts

Boat battery capacity charts are a valuable resource for selecting the right battery for your boat. These charts provide an easy-to-read breakdown of different battery models and their performance characteristics. By understanding these charts, you can make an informed decision when selecting the best boat battery capacity for your needs.

The Basics of Marine Battery Capacity Charts

Boat battery capacity charts typically include important specifications such as the battery’s voltage, amp-hour rating, and reserve capacity. The voltage represents the electric potential difference of the battery, while the amp-hour rating indicates the amount of current the battery can provide in a specific time period. Reserve capacity, on the other hand, measures the number of minutes a battery can deliver a specific discharge current before its voltage drops below a certain level.

Other critical specifications you’ll find on boat battery capacity charts include the battery’s weight, dimensions, and recommended usage. These specifications can help you identify which battery size and capacity is suitable for your boat and electrical needs.

Using Boat Battery Capacity Charts

When using marine battery capacity charts, it’s essential to compare different battery models’ specifications side-by-side. Look for batteries with the best combination of voltage, amp-hour rating, and reserve capacity within your budget. Also, consider factors such as weight and dimensions to ensure the battery you choose will fit your boat and be easy to install.

In addition, marine battery capacity charts can help you identify the best battery for specific applications. For example, if you need a battery for starting your boat’s engine, choose one with a high cranking current rating. For powering your boat’s electrical systems, select a battery with a high amp-hour rating and reserve capacity.

Recommended Boat Battery Capacities for Different Types of Boats

Choosing the best boat battery capacity depends on various factors, including the type of boat and its electrical needs. In this section, I will provide insights into the recommended boat battery capacities for different types of boats to help you make an informed decision.

Sailboats

For sailboats, the ideal marine battery capacity ranges between 200 and 400 amp-hours, with two to three 12-volt batteries in series or parallel. This capacity provides enough power to operate the lights, navigation equipment, and communication devices during extended trips.

Small Boats

If you have a small boat, such as a kayak or a canoe, a 50 amp-hour battery is sufficient to power the basic electrical components, such as the trolling motor or depth finder. Consider a deep-cycle battery, which provides a longer lifespan and better efficiency.

Mid-Size Power Boats

For mid-size power boats, such as bowriders or runabouts, the recommended boat battery capacity is between 400 and 800 amp-hours, with two to four 12-volt batteries in series or parallel. This capacity can handle the increased power demands of amenities like a refrigerator, a sound system, and other electrical devices.

Larger Boats

For larger boats, such as motor yachts or houseboats, a marine battery capacity of at least 1000 amp-hours is recommended, with four to six 12-volt batteries in series or parallel. This capacity can power all the electrical systems, including air conditioning, water heaters, and other appliances.

As seen in the chart above, the recommended boat battery capacities for different types of boats vary depending on the size and electrical demands. Always consult your boat’s manual or a professional technician for guidance on the appropriate boat battery capacity.

Conclusion

I cannot overstate the importance of understanding your marine battery capacity. A reliable and efficient electrical system is essential for enjoying worry-free boating experiences, and to ensure this, you must follow the recommendations provided in this article to optimize your boat’s power capabilities.

Key Takeaways

Here are some marine battery capacity key takeaways from this article:

  • Boat battery capacity is the amount of electrical power a marine battery can supply.
  • The size of the battery determines its capacity, and this affects the battery’s performance and longevity.
  • boat battery capacity calculator can help you determine the appropriate battery capacity for your boat.
  • There are various factors to consider when choosing the best boat battery capacity – from the type of battery to the usage patterns and environmental conditions.
  • Meeting the specific battery capacity requirements for your boat is crucial for a reliable electrical system.
  • If you find that your current boat battery capacity is insufficient, you can increase it by upgrading to a higher capacity battery or adding parallel batteries.
  • Optimizing your boat battery capacity is essential for maximizing the efficiency and lifespan of your battery.
  • Boat battery capacity charts provide valuable information about different battery models and their performance characteristics.
  • Recommended boat battery capacities vary depending on the type of boat.

In conclusion, understanding your boat battery capacity is crucial for a reliable and efficient electrical system on the water. By following the recommendations provided in this article, you can optimize your boat’s power capabilities and enjoy worry-free boating experiences.

FAQ’s about Marine Battery Capacity

What is marine battery capacity?

Boat battery capacity refers to the amount of electrical charge that a marine battery can store. It determines how long the battery can power your boat’s electrical systems before it needs to be recharged.

Why is marine battery capacity important?

Boat battery capacity is important because it determines the amount of time you can use your boat’s electrical systems, such as lights, electronics, and accessories, before needing to recharge the battery. A higher capacity battery allows for longer usage time.

How do I determine the battery capacity that my boat needs?

To determine the appropriate battery capacity for your boat, you need to consider the electrical demands of your boat’s systems. This includes the power requirements of lights, electronics, and other accessories. Using a boat battery capacity calculator can help you determine the ideal capacity.

What factors affect marine battery capacity?

Several factors can affect boat battery capacity, including the type of battery you choose, usage patterns, climate conditions, and the overall electrical demands of your boat. It is important to consider these factors when selecting the best boat battery capacity for your needs.

How can I increase my marine battery capacity?

If you find that your current boat battery capacity is insufficient, there are several strategies you can use to increase it. These include upgrading to a higher capacity battery, adding parallel batteries, or implementing energy-saving practices to extend the battery’s usage time.

How can I optimize my marine battery capacity?

To optimize your boat battery capacity, you can conserve power by using energy-efficient equipment, managing your electrical systems properly, and practicing good battery maintenance habits. These measures will help maximize the efficiency and lifespan of your boat’s battery.

How do I read marine battery capacity charts?

Boat battery capacity charts provide important information about different battery models and their performance characteristics, including capacity, discharge time, and voltage. Reading these charts can help you select the best boat battery capacity for your specific needs.

What are the recommended marine battery capacities for different types of boats?

The recommended boat battery capacity will vary depending on the type of boat and its electrical requirements. Small boats may require a lower capacity battery, while larger boats with more electrical systems will need a higher capacity battery. It is recommended to consult a boat battery capacity guide for specific recommendations based on your boat type.

Your Boat’s Power Requirements

Boat Maintenance and Service Schedule is Critical


MarineBatteryGuide.com is a participant in the Amazon Services LLC Associates Program, an affiliate advertising program designed to provide a means for sites to earn advertising fees by advertising and linking to Amazon.com,

Links on this marine battery capacity page are sponsored affiliate links and the owner makes commission if you buy after clicking these links. The owner is not a bona-fide user of marine battery capacity. However, he has thoroughly researched marine battery capacity and provided a personal opinion only. This disclosure is in accordance with the Federal Trade Commission’s 16 CFR, Part 255: “Guides Concerning the Use of Endorsements and Testimonials in Advertising.”

Proper Boat Battery Storage Ensures Maximum Performance

As a boat owner, it’s essential to prioritize proper boat battery storage to ensure maximum performance and longevity. Without the right storage solutions, your batteries can quickly deteriorate and fail, causing significant problems during your boating adventures. In this section, I’ll provide expert advice on marine battery storagebattery storage solutionsboat battery maintenance, and boat battery care to help you keep your boat batteries in top condition.


boat-battery-storage.jpg

Newport Trolling Motor Smart Battery Box Power Center with USB and DC Ports

A well-organized boat battery storage facility with multiple battery packs of different sizes and shapes neatly arranged on shelves. The environment is clean, bright and well-lit with a hint of natural light peeking through the window. There are no signs of clutter or chaos but it’s evident that the batteries are being cared for meticulously.

The shelves are made of sturdy materials, and each battery pack has a clear label indicating its type, voltage, date of acquisition, and other relevant details. The visual perspective allows a viewer to see all the shelves at once in a single frame, giving an overall impression of a professional and efficient boat battery storage system.


Boat Battery Storage Key Takeaways:

  • Efficient boat battery storage is essential for prolonging battery life and maximizing performance.
  • Choosing the right battery storage solutions can significantly impact the safety and longevity of your boat batteries.
  • Regular maintenance, including cleaning and checking electrolyte levels, is crucial for optimal battery function.
  • Proper preparation and safe storage during long periods of inactivity are necessary to prevent damage to your batteries.
  • Regularly monitoring battery health and addressing issues promptly can help prevent damage and prolong battery life.

Understanding Boat Battery Basics

Before diving into storage tips, it’s important to have a basic understanding of boat batteries. Regular boat battery maintenance and care practices are essential for prolonging battery life and avoiding unexpected breakdowns.

Boat Battery Maintenance

Regular cleaning is crucial for maintaining battery health. Use a wire brush to remove any corrosion and grime from the terminals and connections. Be sure to wear gloves and eye protection when handling batteries. Check the electrolyte levels regularly and top up with distilled water as needed.

Boat Battery Care

Proper care is essential for ensuring that your boat batteries remain in optimal condition. Avoid overcharging or undercharging your batteries, and ensure that they are fully charged before use. Disconnect your batteries when not in use for extended periods to prevent battery drain. Regularly inspect your batteries for any signs of damage, such as cracks or leaks.

“The key to a long-lasting boat battery is proper maintenance and care. Regular cleaning, checking electrolyte levels, and ensuring proper connections can help avoid unexpected breakdowns and enhance longevity.”

Choosing the Right Battery Storage Solutions

When it comes to storing your boat batteries, having the right storage solution can make all the difference. There are several options to consider, each with its own set of benefits and drawbacks.

Battery Storage Compartments

One option is to store your batteries in compartments designed specifically for battery storage. These compartments can provide a secure and organized location for your batteries, which can be especially useful if you have limited space on your boat. However, it’s important to ensure that the compartment is properly ventilated to allow for any gas buildup to escape, and that the batteries are firmly secured to prevent damage during rough waters.

Waterproof Battery Storage

If you’re concerned about exposure to water, consider using waterproof storage containers for your batteries. These containers can protect your batteries from water damage, which can be especially important if you frequently encounter rough waters. However, it’s important to ensure that the container is properly sealed and that your batteries are securely fastened inside.

Boat Battery Box

Another option to consider is using a boat battery box. These boxes are designed specifically to hold boat batteries and can provide additional protection against exposure to the elements. They can also help to reduce the risk of damage due to vibrations and impacts during rough waters. However, it’s important to ensure that the box is properly ventilated to prevent gas buildup and that it’s securely fastened to prevent movement.

Ultimately, the right storage solution for your boat batteries will depend on your specific needs and preferences. Consider factors such as space limitations, exposure to water, and the level of protection you need to make an informed decision.

Preparing Your Batteries for Storage

Before storing your boat batteries, it’s essential to ensure that they are clean, charged, and disconnected to prevent potential damage or discharge during storage. Here are some step-by-step instructions on how to prepare your batteries for optimal storage:

  1. Clean your batteries: Use a battery cleaner and a wire brush to remove any dirt, grime, or corrosion from the battery terminals and surrounding areas. Make sure to wear gloves and eye protection during this process.
  2. Check electrolyte levels: If your batteries have removable caps, check the electrolyte levels and add distilled water if needed. Make sure to follow the manufacturer’s recommendations for proper levels.
  3. Charge your batteries: Ensure your batteries are fully charged before storing them to prevent discharge and potential damage. You can either use a battery charger or a solar-powered maintainer to charge your batteries.
  4. Disconnect your batteries: To prevent battery drain, disconnect your batteries from the boat’s electrical system. Make sure to remove the negative cable first and then the positive cable.

By following these steps, you can ensure that your boat batteries are clean, fully charged, and disconnected, ready for optimal storage during the off-season.

Boat Battery Storage Tip:

Consider using a battery maintainer to keep your batteries fully charged during storage. These devices automatically monitor and adjust the charge level to maintain peak performance, ensuring that your batteries are ready to go when you’re ready to hit the water again.

Storing Batteries in a Safe Location

Where you store your boat batteries is critical for maintaining safety and prolonging their lifespan. Here are some tips:

Choose a dry location: Wet conditions can cause batteries to leak or corrode. Therefore, choose a dry area on your boat to store your batteries.

Avoid areas with direct sunlight or heat sources: High temperatures can damage batteries, so avoid storing them in areas with direct sunlight or a heat source.

Ensure proper ventilation: Batteries produce hydrogen gas, which can be dangerous if it accumulates in a confined space. Therefore, make sure the storage location has proper ventilation to prevent the gas from building up.

Keep the batteries secure: When storing batteries on your boat, make sure they are securely fastened so they don’t move around and potentially cause damage.

Consider a battery box: A waterproof battery box can provide additional protection against moisture and prevent accidental contact with other electrical components on your boat. Make sure the battery box is large enough to accommodate your batteries.


Remember that safety should always be a priority when it comes to storing your boat batteries. By following these tips, you can ensure that your batteries are protected and ready for your next boating adventure.

Maintaining Battery Charge During Storage

When storing your boat batteries for an extended period of time, it is essential to take steps to maintain battery charge. Without proper maintenance, your batteries can lose charge and suffer from decreased performance or even complete failure when you’re ready to use them again. Here are some tips for maintaining battery charge during storage:

Charge Your Batteries: Before putting your boat batteries into storage, it’s important to fully charge them. This will help to prevent the batteries from losing their charge over time.

Use a Battery Maintainer: A battery maintainer can be a valuable tool for maintaining optimal battery charge during storage. These devices provide a low-level charge to the batteries, helping to prevent discharge while also avoiding overcharging.

Periodically Charge Your Batteries: If you don’t have a battery maintainer, another option is to periodically charge your batteries during storage. You should charge them at least once every month to maintain an adequate charge.

Disconnect Your Batteries: If you don’t plan on using your boat for an extended period of time, it may be best to completely disconnect your batteries. This will prevent any parasitic loss of power and help maintain battery charge.

By following these tips, you can maintain the charge on your boat batteries and ensure that they are ready to use when you are. Remember that proper battery maintenance and care are critical to extending the life of your batteries and ensuring their optimal performance when you need them most.

Monitoring Battery Health

Regular monitoring of your boat batteries is crucial in detecting potential issues and preventing damage. Over time, batteries can wear out and lose capacity, leading to decreased performance and lifespan. Keeping an eye on the health of your batteries can help ensure they remain in optimal condition for longer. Here are some tips for monitoring battery health:

  • Checking voltage levels: Use a voltmeter to check the voltage of your batteries regularly. A healthy battery should read around 12.6 volts or higher. If the voltage drops consistently below this level, it may indicate a problem.
  • Inspecting for damage: Regularly check your batteries for any signs of damage, such as cracks or leaks. If you notice any damage, replace the battery immediately.
  • Conducting load tests: A load test can help determine the health of your battery by measuring its ability to deliver power under load. If you notice a significant drop in voltage during the test, it may indicate a problem with the battery.

By regularly monitoring your boat batteries, you can catch issues early and prevent more significant problems down the line. Remember to prioritize proper maintenance and care to ensure your batteries remain in top condition for longer.

Preventing Battery Corrosion

Proper boat battery maintenance and care not only enhances performance but also extends their lifespan. One common issue that can arise with batteries over time is corrosion. Corrosion can occur due to a variety of factors, including exposure to moisture, high temperatures, or a buildup of battery acid. If left unchecked, corrosion can lead to poor connectivity, prevent batteries from charging properly, or even cause irreparable damage. Here are some tips to prevent battery corrosion:

Clean battery terminals regularly: One effective way to prevent corrosion is to clean your battery terminals regularly. Use a mixture of baking soda and water to scrub the terminals and any other parts of the battery that may be affected. Rinse the battery with clean water and dry it thoroughly before reconnecting it.

Apply anti-corrosion spray: After cleaning the battery terminals, apply an anti-corrosion spray to protect them from future damage. These sprays contain a special formula that can help prevent the buildup of acid and other corrosive materials on the battery.

Use dielectric grease: Another effective way to prevent corrosion is to apply dielectric grease to the battery terminals. This grease helps repel moisture and prevent the buildup of acid, protecting the battery from damage.

Keep the battery dry: Batteries that are continually exposed to moisture are more susceptible to corrosion. Whenever possible, store your batteries in dry locations, protected from rain, and other sources of moisture.

By following these simple steps, you can help prevent battery corrosion, ensuring your boat batteries remain in optimal condition and operate smoothly for years to come.

Tips for Winterizing Your Boat Batteries

Winter weather can be harsh on boat batteries, so proper winterization is essential to keep them in good condition. Here are some tips to help you with winterizing your boat batteries:

Use a battery blanket: A battery blanket can help keep your batteries warm during cold weather. This is especially useful if your boat will be in storage during the winter months.

Remove batteries: If your boat will not be used during winter, it’s best to remove the batteries and store them in a cool, dry place. This will help prevent damage from freezing temperatures.

Store in a temperature-controlled environment: If you’re unable to remove the batteries, store your boat in a temperature-controlled environment such as a garage or storage unit. This will help protect the batteries from extreme temperatures.

Charge the batteries: Before storing the batteries for winter, make sure they are fully charged. This will help prevent sulfation and keep the batteries in good condition.

Check electrolyte levels: If your batteries are not sealed, check the electrolyte levels and add distilled water if necessary. This will help prevent damage from freezing and ensure proper performance when you’re ready to use your boat again.

Use a battery maintainer: If you’re unable to charge your batteries periodically during the winter months, consider using a battery maintainer. This device will help keep your batteries charged and in good condition without overcharging them.

Clean the batteries: Before storing for winter, clean the batteries with a mixture of baking soda and water to remove any corrosion. Rinse well and dry thoroughly before storing.

By following these tips, you can help ensure that your boat batteries are well-maintained and ready for use when you’re ready to hit the water again in the spring. It’s important to prioritize proper battery maintenance and storage to ensure the longevity and performance of your boat batteries.

Ensuring Proper Battery Reinstallation

After winter storage or maintenance, it’s crucial to properly reinstall your boat batteries. This not only ensures safety but also maximizes their performance and longevity. Here are the key steps to follow:

Reconnect the cables: Start by reconnecting the positive cable first, followed by the negative cable. Ensure that the connections are tight and secure.

Inspect for damage: Check the battery for any signs of damage, such as cracks or leaks. If you notice any damage, replace the battery.

Clean the terminals: Use a wire brush to clean the battery terminals and cable connectors. This ensures a good electrical connection and helps prevent corrosion.

Test voltage levels: Before use, test the voltage levels of the battery using a voltmeter. This will ensure that the battery is fully charged and ready for use.

By following these steps, you can ensure that your boat batteries are properly reinstalled and ready to power your next adventure on the water.

Troubleshooting Common Battery Issues

Even with regular maintenance and proper care, boat batteries can experience issues that affect their performance and lifespan. Here are some common battery problems and troubleshooting tips to address them:

Sulfation

Sulfation is a buildup of lead sulfate crystals on the battery plates, which can reduce the battery’s capacity and performance. To address sulfation:

  1. Use a desulfator to break down the crystal buildup and restore the battery’s capacity.
  2. Charge the battery fully and regularly to prevent the buildup of crystals.

Low Electrolyte Levels

The liquid electrolyte in a battery can evaporate over time, causing the acid levels to drop. To address low electrolyte levels:

  1. Check the electrolyte levels regularly and add distilled water to maintain proper levels.
  2. If the electrolyte levels are consistently low, the battery may need to be replaced.

Battery Acid Leaks

A battery acid leak can cause damage to the battery and surrounding components. To address a battery acid leak:

Wear gloves and protective eyewear when handling the battery.

Neutralize the acid with baking soda and water solution.

Clean the battery and surrounding components thoroughly.

Identify and repair the source of the leak or replace the battery.

Conclusion about Boat Battery Storage

In conclusion, I have shared with you expert advice on efficient boat battery storage. By following the tips and practices described in this article, you can ensure that your boat batteries are well-maintained, safe, and ready for use whenever you need them.

Key Takeaways

  • Understand the basics of boat battery maintenance and care, including regular cleaning, checking electrolyte levels, and ensuring proper connections.
  • Choose the right boat battery storage solutions, such as battery storage compartments, waterproof containers, and specialized boat battery boxes.
  • Prepare your batteries for storage by cleaning, charging, and disconnecting them.
  • Store batteries in a safe location with proper ventilation, temperature control, and protection against vibrations.
  • Maintain battery charge during storage with periodic charging or using a battery maintainer.
  • Monitor battery health regularly by checking voltage levels, inspecting for damage, and conducting load tests.
  • Prevent battery corrosion by using anti-corrosion sprays, cleaning terminals, and applying dielectric grease.
  • Winterize your boat batteries if you live in an area with harsh winter conditions.
  • Ensure proper battery reinstallation by following steps for reconnecting batteries, conducting a thorough inspection, and testing voltage levels.
  • Troubleshoot common battery issues such as sulfation, low electrolyte levels, and battery acid leaks.

Remember, the longevity and performance of your boat batteries are crucial to your boating adventures. By following the guidelines provided in this article, you can ensure that you get the most out of your batteries while maximizing your safety and enjoyment on the water.

FAQ

How often should I clean my boat batteries?

It is recommended to clean your boat batteries at least once every three months to remove any dirt, debris, or corrosion that may have accumulated.

How do I check the electrolyte levels in my boat batteries?

To check the electrolyte levels, carefully remove the cell caps and visually inspect each cell. The electrolyte should cover the battery plates, but should not exceed the maximum fill level.

Should I disconnect my boat batteries when storing them?

Yes, it is important to disconnect your boat batteries when storing them. This helps prevent any drainage or unnecessary loss of charge during the off-season.

Can I store my boat batteries in a non-ventilated area?

No, it is critical to store boat batteries in a well-ventilated area to prevent the build-up of potentially dangerous gases. Always ensure there is adequate airflow around the batteries.

How often should I charge my boat batteries during storage?

It is best to periodically charge your boat batteries during extended storage periods to maintain their charge. Aim to charge them every 4-6 weeks to prevent excessive discharge.

What should I use to clean the battery terminals?

You can use a mixture of baking soda and water to clean the battery terminals. Simply apply the mixture with a brush and scrub away any corrosion or buildup.

How can I prevent sulfation in my boat batteries?

To prevent sulfation, it is important to keep your batteries charged and avoid deep discharges. Additionally, using a battery maintainer or float charger can help keep the batteries in a fully charged state.

What are some signs of a damaged boat battery?

Signs of a damaged boat battery may include reduced performance, inability to hold a charge, leakage of battery acid, or bulging of the battery case. If you notice any of these signs, it may be time to replace the battery.

How do I troubleshoot low voltage in my boat batteries?

If you are experiencing low voltage in your boat batteries, start by checking the connections for any loose or corroded terminals. You can also test the voltage with a multimeter to ensure it meets the manufacturer’s specifications.

Can I use a regular car battery in my boat?

It is not recommended to use a regular car battery in a boat. Marine batteries are specifically designed to withstand the unique demands of boating, including the constant vibrations and the need for deep cycling.


Boat Maintenance and Service Schedule is Critical


MarineBatteryGuide.com is a participant in the Amazon Services LLC Associates Program, an affiliate advertising program designed to provide a means for sites to earn advertising fees by advertising and linking to Amazon.com,

Links on this boat battery storage page are sponsored affiliate links and the owner makes commission if you buy after clicking these links. The owner is not a bona-fide user of boat battery storage products. However, he has thoroughly researched boat battery storage products and provided a personal opinion only. This disclosure is in accordance with the Federal Trade Commission’s 16 CFR, Part 255: “Guides Concerning the Use of Endorsements and Testimonials in Advertising.”


Boat Battery Installation for Reliable Power

Welcome aboard! As a seasoned boater or a new enthusiast, you understand the importance of a reliable power source to keep your vessel running smoothly on U.S waters. However, installing a boat battery can be a daunting task, especially if you’re new to marine electrical systems. That’s where this boat battery installation guide comes in.

boat-battery-installation.jpgIn this comprehensive guide, I’ll walk you through every step of the process, from understanding the different types of marine batteries to wiring your boat battery and ensuring its safety.


Video: Boat Battery Installation


By the end of this guide, you’ll be equipped with the essential knowledge and skills to install and maintain a boat battery that will power your voyages safely and reliably. Whether you’re preparing for a day trip or a more extended journey, this guide will give you the confidence to navigate the waters with peace of mind.

Boat Battery Installation – Key Takeaways:

  • This guide provides step-by-step instructions for installing and maintaining a boat battery for reliable power on U.S waters.
  • Understanding the different types of marine batteries and assessing your power needs are crucial steps before starting the installation process.
  • Proper preparation, wiring techniques, and regular maintenance are vital for a safe and functional boat battery setup.
  • Common battery issues and safety precautions, such as preventing electrical hazards and leaks, should be addressed to ensure a safe boating experience.
  • The guide offers insights and considerations for upgrading your boat’s electrical system for enhanced power distribution and efficiency.

Understanding Boat Batteries and Marine Systems

Before diving into the boat battery installation guide, it’s essential to have a basic understanding of boat electrical systems and the different types of marine batteries.

Marine batteries are specially designed for the harsh and unpredictable conditions of water-based environments. They come in three primary types: starting batteriesdual-purpose batteries, and deep-cycle batteries.

Battery Type Primary Use Pros Cons
Starting Battery Starting engines High cranking power Not suitable for deep cycle use
Dual-Purpose Battery Starting and moderate trolling Moderate cranking power and can handle some deep cycling Less efficient charging and not ideal for heavy trolling or prolonged use
Deep-Cycle Battery Trolling motors, electronics, and other heavy use Efficient charging, long run time and service life, and can handle deep cycling Higher cost and lower cranking power

Understanding the battery type that best suits your boating needs is essential in ensuring reliable performance and a long service life. It’s also important to note that different boats and electronic systems may have different power demands, so choose a battery that can meet your needs.

To ensure the safety and efficiency of your marine electrical system, it’s recommended to use not only the right battery type but also high-quality wiring, fuses, and switches that can handle the electrical loads without overheating or causing system failure.

Assessing Your Power Needs

Before choosing a boat battery, it’s essential to assess your power needs. This step ensures that you select a battery with adequate capacity to support your electrical demands while on the water.

To determine your power needs, make a list of all the electrical systems and devices on your boat, including lights, navigation equipment, pumps, and appliances. Estimate the power consumption of each system in amps per hour (Ah) and add up the total. This value represents the minimum capacity required for your boat battery.

It’s important to note that your power needs may vary depending on how long you plan to be on the water and how often you use your electrical systems. For longer trips, you may need to increase your battery capacity or invest in additional batteries.

Electrical System/Device Power Consumption (Ah)
Lights 1-2
GPS Unit 1-2
Pump 2-3
Radio 3-4
Appliances (Refrigerator, Microwave, etc.) 5-20+

Keep in mind that your boat battery should never be fully discharged, as this can cause permanent damage to the battery and reduce its lifespan. It’s recommended to use only about half of the battery’s capacity before recharging it.

By assessing your power needs, you can choose a boat battery with confidence, knowing that it will provide reliable power for all your boating adventures.

Selecting the Right Battery Type

When it comes to marine batteries, there are several types to choose from. Each has its own advantages and disadvantages, so it’s crucial to choose the right one for your boat’s specific needs. In this section of the boat battery installation guide, we’ll go over the most common marine battery types and help you make an informed decision.

Lead-Acid Batteries

Lead-acid batteries are the most common type of marine battery. They’re affordable, reliable, and relatively simple to maintain. These batteries are available in two subtypes:

  1. Starting BatteriesThese batteries are designed to provide a short burst of high power to start the boat’s engine. They have a large number of thin plates for maximum surface area and minimum internal resistance.
  2. Deep-Cycle Batteries: These batteries are designed to provide a steady flow of power over an extended period. They have fewer, but thicker plates than starting batteries for increased durability and resilience.

Lead-acid batteries are also available as dual-purpose batteries that can perform both starting and deep-cycle functions.

Lithium-Ion Batteries

Lithium-ion batteries are an alternative to lead-acid batteries. They’re lighter and more efficient, with a longer lifespan and faster charging times. However, they’re also more expensive and require specialized charging equipment.

Lithium-ion batteries are available in different chemistries, such as lithium-ion phosphate (LiFePO4) and lithium cobalt oxide (LiCoO2). LiFePO4 is the more commonly used chemistry for marine applications due to its stability and safety features.

Gel Batteries

Gel batteries are a type of lead-acid battery that uses a thickened electrolyte gel instead of liquid. This gel immobilizes the electrolyte, making the battery spill-proof and resistant to vibration. Gel batteries are also maintenance-free and have a longer lifespan than traditional lead-acid batteries. However, they’re more expensive and have a lower charging efficiency.

AGM Batteries

AGM (Absorbent Glass Mat) batteries are another type of lead-acid battery that uses a special glass mat to absorb and hold the electrolyte. This mat also prevents spilling and allows for a higher charge and discharge rate. AGM batteries are maintenance-free and have a longer lifespan than traditional lead-acid batteries. However, they’re more expensive and sensitive to overcharging.

When choosing a battery type for your boat, consider your power needs, budget, and maintenance preferences. Lead-acid batteries are a reliable and affordable option for most boats, while lithium-ion batteries offer superior performance at a higher cost. Gel and AGM batteries are spill-proof and maintenance-free but come with their own set of trade-offs.

Boat Battery Installation – Preparation

Before starting the boat battery installation, it’s essential to prepare thoroughly. Here’s a checklist of tools and materials you’ll need:

  • Marine battery box
  • Marine battery
  • Battery hold-downs
  • Battery cables
  • Wire cutters/strippers
  • Wrenches and screwdrivers
  • Heat-shrink tubing or electrical tape
  • Electrical connectors (ring terminals, butt connectors, etc.)
  • Battery charger

It’s also important to take safety precautions, including:

  • Wearing rubber gloves and eye protection
  • Ensuring the boat’s electrical system is turned off
  • Keeping the battery box and cables away from any heat sources or fuel

By gathering the necessary tools and prioritizing safety, you’ll be well-equipped for a smooth boat battery installation.

Installing the Boat Battery

Now that you’ve determined the right battery for your boat and gathered the necessary tools, it’s time to begin the installation process. Following these step-by-step instructions will help ensure a secure and functional setup for your boat battery.

Step 1: Position the Battery

The first step is to find the appropriate location for your battery. Look for a place that is protected from the elements and where the battery will not be disturbed during rough weather or travel. It’s also important to ensure that the battery is close to the engine and electrical equipment, so the connecting wires are not stretched or strained.

Once you’ve found a suitable location, use the battery box or tray to secure the battery in place. This will prevent it from moving around while the boat is in motion. Be sure to tighten the bolts or screws securely to prevent any movement that could damage the electrical connections or the battery itself.

Step 2: Connect the Positive Terminal

The next step is to connect the positive terminal of the battery to the boat’s electrical system. Start by connecting the positive cable to the battery’s positive terminal using an appropriate connector. Use a wrench to tighten the connector securely, making sure it doesn’t move or wiggle around.

Next, connect the other end of the positive cable to the boat’s electrical system, usually through a fuse or circuit breaker to prevent electrical overload. Carefully identify the appropriate connection point in the boat’s electrical system and connect the cable securely using an appropriate connector.

Step 3: Connect the Negative Terminal

After connecting the positive terminal, it’s time to connect the negative terminal. Start by connecting the negative cable to the battery’s negative terminal using an appropriate connector. Use a wrench to tighten the connector securely, making sure it doesn’t move or wiggle around.

Next, connect the other end of the negative cable to the boat’s electrical system, usually through a common ground point like the engine block, or a negative bus bar. Carefully identify the appropriate connection point in the boat’s electrical system and connect the cable securely using an appropriate connector.

Step 4: Test the System

Before closing up the battery compartment, it’s important to test the system to ensure everything is working correctly. Use a multimeter or voltmeter to measure the voltage at the battery terminals while the engine is running. The voltage should be between 13.8 and 14.4 volts.

If the voltage is too low, it may indicate a problem with the connections or the battery itself. Double-check all connections for tightness and corrosion, and make sure the battery is fully charged. If the voltage is too high, it could indicate a problem with the charging system, and you should have it checked by a professional.

By following these steps and taking the necessary precautions, you can ensure a safe and functional boat battery installation. Remember to always wear protective gear, work in a well-ventilated area, and follow the manufacturer’s instructions for your specific battery model. With a reliable power source, you can enjoy your voyages on the water with confidence and peace of mind.

Wiring Your Boat Battery

Proper wiring is crucial for a safe and functional boat battery installation. Before starting, ensure that all the necessary tools and materials are available, and take appropriate safety precautions.

The first step in wiring your boat battery is connecting the positive and negative terminals to the corresponding wires. The positive terminal should be connected to the red wire, while the negative terminal should be connected to the black wire. It’s crucial to ensure that the wires are correctly connected to avoid electrical hazards and battery damage.

Once the wires are connected, it’s essential to organize and secure them properly. Use cable ties or clamps to hold the wires firmly in place, preventing them from coming loose or rubbing against sharp edges that could cause damage. It’s also crucial to ensure that the wires are not pinched or stretched, which could lead to short circuits and other electrical problems.

When wiring your boat battery, it’s also crucial to consider the location of other electrical components and devices. Keep wires away from hot or moving parts, and avoid running them too close to other wires, which could cause interference and reduce performance.

As you complete the wiring process, periodically check for any loose or damaged wires and make necessary repairs. Regular inspection and maintenance of your boat battery wiring will help ensure its reliability and safety over time.

Tip: If you’re unsure about how to wire your boat battery, consult a professional electrician or experienced boater for guidance.

Battery Maintenance and Care

Proper maintenance is crucial for the optimal performance and longevity of your boat battery. Below are essential tips for maintaining and caring for your battery:

  • Charge your battery regularly: A fully charged battery will last longer and perform better. If your boat is not in use, make sure to charge the battery every two weeks to prevent sulfation.
  • Clean your battery terminals: Corrosion can build up on the battery terminals, hindering the flow of electricity. Remove any corrosion with a wire brush and apply a terminal protective spray to prevent further build-up.
  • Check water levels: If your battery is not a sealed type, check the water level in each cell regularly. Add distilled water if the level is low, and do not overfill the cells.
  • Store your battery properly: If you are not using your boat for an extended period, remove the battery and store it in a cool, dry place, away from direct sunlight.

To ensure proper safety, follow these precautions when caring for your battery:

  1. Wear gloves and eye protection when handling the battery to avoid coming into contact with corrosive materials.
  2. Keep the battery away from heat sources, sparks, and flames to prevent the risk of explosion.
  3. Do not smoke or use any open flames around the battery.
  4. Never attempt to open a sealed battery or add any other substance other than distilled water.

Troubleshooting Common Battery Issues

While proper installation and maintenance can prevent many battery issues, sometimes problems can arise with even the best care. Here are some common battery problems and their solutions to help keep your boat’s electrical system running smoothly.

Low Voltage

If your battery is not holding a charge, it may be due to low voltage. This can be caused by a variety of factors, including leaving the battery unused for an extended period or overusing the battery without recharging it properly. To fix this issue, try recharging the battery to its full capacity and monitor it for further signs of low voltage.

Poor Performance

If your battery is not providing enough power to your boat’s electrical system, you may experience poor performance or even equipment failure. This can be caused by a number of factors, including a weak battery, corroded terminals, or loose connections. To address this issue, try replacing the battery or cleaning and tightening the battery connections.

Battery Overheating

Overheating can occur when the battery is subjected to high temperatures or prolonged use. This can cause damage to the battery or even pose a safety hazard. To prevent overheating, make sure to follow proper battery maintenance procedures, such as regular cleaning and inspection, and avoid using the battery excessively in hot conditions.

Battery Leaks

Battery leaks can occur when the battery casing becomes damaged or cracked. This can lead to corrosive chemicals leaking out and potentially causing damage to the boat or posing a safety hazard to passengers. To prevent leaks, make sure to store and transport the battery properly and regularly inspect it for signs of wear or damage.

“It’s always a good idea to have a backup battery on hand in case of emergency. This can help keep your boat’s electrical system running smoothly even if you encounter issues with your primary battery.”

Ensuring Boat Battery Safety

Safety is the top priority when dealing with boat batteries. Mishandling or improper installation of batteries can result in serious accidents, such as electrical shocks or battery explosions. Therefore, it’s essential to follow the safety precautions during installation, usage, and maintenance of boat batteries.

Key Safety Measures for Boat Battery Installation:

  • Protective Gear: Wear rubber gloves and eye protection while handling boat batteries. Avoid loose clothing and jewelry that can catch or hold onto battery terminals.
  • Location and Ventilation: Install batteries in a dry and well-ventilated location to avoid overheating or accumulation of explosive gases. Ensure that the batteries are secured and cannot move during rough waters.
  • Electrical Hazards: Always disconnect the boat’s electrical system before installing or servicing batteries. Avoid touching battery terminals with bare hands or metal objects. Use insulated tools to prevent electrical shocks.
  • Preventing Battery Leaks: Check battery terminals and connections for signs of corrosion, tighten loose connections, and clean battery surfaces regularly. Use a battery tray or acid-absorbent mat to contain any leaks or spills.

In addition to these safety measures, it’s essential to have a basic understanding of boat batteries and their proper maintenance. Regular cleaning, charging, and testing of boat batteries can prevent accidents and prolong battery life. Refer to the Boat Battery Maintenance and Care section for practical tips and guidelines on maintaining your boat battery.

Upgrading Your Boat’s Electrical System

As boating technology continues to evolve, upgrading your boat’s electrical system can improve its efficiency, power distribution, and safety. Here are some considerations to keep in mind when upgrading your boat’s electrical system:

Assessing Your Needs

Before upgrading your boat’s electrical system, it’s essential to assess your power needs. Consider the electrical components that you use most frequently, such as navigation systems, radios, and lights, and determine whether your current electrical system can handle the load. If you plan to add new electronics or appliances to your boat, you’ll likely need to upgrade your electrical system to accommodate them.

Choosing the Right Components

Choosing the right components is crucial when upgrading your boat’s electrical system. Look for high-quality, marine-specific equipment that is designed to withstand the harsh conditions of marine environments. You may also want to consider upgrading to lithium-ion batteries, which are lightweight, recharge quickly, and have a longer lifespan compared to traditional lead-acid batteries.

Hiring a Professional

Upgrading your boat’s electrical system can be a complex and time-consuming process. To ensure that the job is done safely and correctly, consider hiring a professional marine electrician to handle the installation. A professional will have the knowledge and expertise to assess your power needs, select the right components, and install them properly.

Maintaining Your Electrical System

Regular maintenance is crucial for the longevity and optimal performance of your boat’s electrical system. Check your electrical components and wiring regularly for signs of wear, corrosion, or damage. Keep your batteries charged and clean, and ensure that all electrical connections are secure and tight.

Tip: When upgrading your boat’s electrical system, it’s essential to prioritize safety. Consult with a professional if you’re unsure about any aspect of the installation or maintenance.

Upgrading your boat’s electrical system can enhance your boating experience and provide you with a reliable and safe power source. By assessing your power needs, choosing the right components, and maintaining your system properly, you’ll enjoy a hassle-free voyage on the U.S waters.

Conclusion

In conclusion, this boat battery installation guide is a valuable resource for anyone looking to power their voyages safely and reliably. By following the step-by-step instructions and essential tips provided, you can ensure a proper and functional installation of your boat battery.

Remember to assess your power needs and select the right battery type before beginning the installation process. Proper preparation and safety precautions are crucial for a successful installation, and regular maintenance can help prolong the life of your battery. In the event of common battery problems, troubleshooting solutions are available.

Furthermore, upgrading your boat’s electrical system can improve its power distribution and efficiency. Ultimately, by prioritizing safety and following the guidelines in this boat battery installation guide, your boating experience can remain enjoyable and hazard-free.

Thank you for reading this comprehensive boat battery installation guide. I hope it has provided you with the knowledge and skills to install and maintain your boat battery with confidence and ease.

FAQ’s about Boat Battery Installation

How do I choose the right boat battery for my vessel?

Selecting the right boat battery depends on your power needs and the type of boat you have. You should consider factors such as battery capacity, reserve capacity, and the type of marine battery that suits your requirements. It’s recommended to consult with a marine specialist or refer to the manufacturer’s guidelines for your specific boat model.

How often should I charge my boat battery?

The frequency of charging your boat battery depends on its usage and the type of battery you have. It’s generally recommended to charge your battery after each use, especially if it has been discharged significantly. Additionally, it’s essential to follow the manufacturer’s recommendations regarding charging intervals and techniques.

Can I use a car battery for my boat?

While car batteries and marine batteries may seem similar, they are designed for different purposes. Marine batteries are specifically built to withstand the harsh marine environment, including vibrations, moisture, and constant use. It’s advisable to use a marine battery that meets the requirements of your boat’s electrical system and provides the necessary power and durability.

How do I properly maintain my boat battery?

To ensure the longevity and performance of your boat battery, regular maintenance is essential. This includes keeping the battery clean and free from corrosion, checking and maintaining proper water levels (for flooded lead-acid batteries), and charging the battery as recommended by the manufacturer. It’s also important to store the battery in a cool, dry place and avoid overcharging or discharging it excessively.

What should I do if my boat battery fails to hold a charge?

If your boat battery fails to hold a charge, it could be due to various reasons, such as sulfation, a faulty cell, or excessive discharge. It’s recommended to check the battery’s voltage using a multimeter and ensure it’s within the acceptable range. If the battery is consistently failing to charge, it may be time to replace it with a new one.

How can I prevent battery leaks on my boat?

To prevent battery leaks on your boat, ensure that the battery terminals are clean and tightened properly. Avoid overfilling the battery with water (for flooded lead-acid batteries) and use caution when handling and positioning the battery to prevent any physical damage that could lead to leaks. Regularly inspect the battery for any signs of corrosion or damage and address them promptly.

What safety precautions should I take when working with boat batteries?

Some essential safety precautions when working with boat batteries include wearing protective gear such as gloves and goggles, ensuring proper ventilation in the battery compartment, avoiding smoking or open flames near the battery, and disconnecting the boat’s electrical system before working on the battery. It’s also crucial to handle the battery with care, avoiding dropping or mishandling it to prevent injury or damage.

How can I troubleshoot low voltage issues with my boat battery?

Low voltage issues with your boat battery can be caused by various factors, such as a discharged battery, loose connections, or a faulty alternator. You can troubleshoot low voltage issues by checking the battery’s charge level, inspecting the connections for any loose or corroded terminals, and testing the alternator’s output using a multimeter. If the issue persists, it’s advisable to consult a marine specialist for further assistance.

Can I upgrade my boat’s electrical system without professional help?

While minor upgrades or replacements can be done by individuals with basic knowledge of electrical systems, it’s recommended to seek professional help for significant upgrades to your boat’s electrical system. A professional can provide expertise and ensure that the upgrades are done safely and in compliance with electrical regulations, minimizing the risk of damage or safety hazards.

Boat Maintenance and Service Schedule is Critical

Boat Battery Replacement Basics


As an Amazon Affiliate I earn from qualifying purchases. MarineBatteryGuide.com is a participant in the Amazon Services LLC Associates Program, an affiliate advertising program designed to provide a means for sites to earn advertising fees by advertising and linking to Amazon.com,

Links on this boat battery installation page are sponsored affiliate links and the owner makes commission if you buy after clicking these links. The owner is not a bona-fide user of boat battery installation. However, he has thoroughly researched about boat battery installation and provided a personal opinion only. This disclosure is in accordance with the Federal Trade Commission’s 16 CFR, Part 255: “Guides Concerning the Use of Endorsements and Testimonials in Advertising.”

Proper Steps to Disconnect Boat Battery

If you’re a boat owner, you know that proper battery disconnection is essential for smooth sailing and the longevity of your battery. In this article, I will guide you through the simple steps to safely disconnect boat battery.

disconnect-boat-battery-guide.jpg

An investment of $27.00 for a solid marine battery maintenance and servicing program is a small price to pay for battery peace of mind

Before we dive into the steps, let’s look at why it’s important to disconnect a boat battery.

Key Takeaways:

  • Proper battery disconnection is essential for a hitch-free sea journey and to ensure the longevity of your battery.
  • Disconnecting a boat battery helps prevent electrical accidents, preserves battery life, and avoids discharge during storage periods.


Let’s gather the necessary tools and materials for the job.

Key Takeaways:

  • Gathering the necessary tools and materials such as wrenches, pliers, and insulated gloves is crucial for disconnecting a boat battery.
  • The tools and materials needed will depend on the type of boat battery and its location.

Before proceeding, ensure you take proper safety precautions.

Key Takeaways:

  • Wear protective gear such as gloves and goggles when disconnecting a boat battery.
  • Work in a well-ventilated area to prevent inhaling hazardous fumes.
  • Avoid contact with metal surfaces.

Once you have taken the necessary safety precautions, locate the battery and identify the positive and negative terminals.

Key Takeaways:

  • Locating the battery and identifying the positive and negative terminals is crucial to ensure proper disconnection.
  • The positive terminal is usually red, while the negative terminal is usually black.


How To Disconnect a Boat Battery

A hand holding a wrench, gently loosening the negative cable of a marine battery. The other hand holds the positive cable away from any metal surfaces. The background shows the beautiful blue ocean and a dock at the harbor.


Now that you have identified the terminals,
it’s time to disconnect the battery.

Key Takeaways:

  • Always start with the negative terminal to avoid accidental short circuits.
  • Use a wrench or pliers to loosen the terminal connector and remove the negative cable from the battery terminal.
  • Repeat the same process for the positive terminal.

After disconnecting the battery,
it’s essential to insulate the terminal ends.

Key Takeaways:

  • Insulating the terminal ends after disconnecting the boat battery is crucial to protect the terminals from corrosion and accidental contact.
  • Use electrical tape or terminal covers to insulate the terminal ends.

If you’re planning to store the disconnected battery,
ensure you do it correctly.

Key Takeaways:

  • Storing the disconnected boat battery in a cool, dry place is essential to ensure its longevity.
  • Periodically checking its charge level during storage periods is crucial to prevent discharge and damage to the battery.

Finally, if you need to reconnect the battery,
follow the reverse order of disconnection and ensure secure connections.

Key Takeaways:

  • Reconnecting the boat battery requires following the reverse order of disconnection and ensuring secure connections.
  • Check the battery charge level after reconnecting to ensure it’s ready for your next trip.

By following these simple steps and safety precautions,
you can ensure a trouble-free sea journey and prolong the life of your boat battery.

Why Disconnecting a Boat Battery is Important

As a boat owner, it’s important to know how to safely disconnect your boat battery. Not only is it necessary for proper maintenance, but it can also prevent electrical accidents and prolong the lifespan of your battery.

“In addition to the safety concerns, leaving a battery connected for extended periods can result in a loss of charge and damage to the battery. Disconnecting the battery when not in use helps prevent potential problems and ensures you have a reliable power source when you need it.”


By properly disconnecting your boat battery, you can also prevent discharge during storage periods. When a battery is not in use, it will slowly lose its charge. Disconnecting it removes any voltage drain and helps preserve its power for when you need it most.

Overall, disconnecting your boat battery is an essential practice to ensure safety and prolong the life of your battery. By following the proper steps and taking necessary precautions, you can prevent accidents and keep your boat battery in top condition.

Gathering the Necessary Tools and Materials

Before disconnecting your boat battery, it is essential to gather all the necessary tools and materials. This ensures a smooth disconnection process and prevents any damage to your boat or battery. Here’s what you’ll need:

  • Wrenches: You’ll need an adjustable wrench or socket wrench to loosen the battery cable connections.
  • Pliers: Use pliers to remove any clamps or brackets holding the battery in place.
  • Insulated gloves: Always wear insulated gloves when working with batteries to protect yourself from electrical shocks.
  • Battery cleaning solution: Have a solution on hand to clean any corrosion around the terminals.
  • Battery brush: Use a brush to scrub away any corrosion on the battery terminals.
  • Terminal puller: If your battery cables are difficult to remove, use a terminal puller to loosen them without damaging the battery.

Once you have gathered all the necessary tools and materials, you’ll be ready to safely disconnect your boat battery. Proper preparation ensures a successful disconnection process and helps keep you safe.

Ensure Proper Safety Precautions

When it comes to disconnecting batteries on a boat, safety precautions are paramount. By following correct safety measures, you can avoid accidents and ensure your safety during the battery disconnection process. Here are some critical safety guidelines to follow:

  1. Wear Protective Gear: Before disconnecting your boat battery, you should wear personal protective equipment, such as insulated gloves, safety glasses, or goggles, and appropriate clothing. This will protect you from the harmful effects of battery acid that can cause burns or other injuries.
  2. Work in a Well-Ventilated Area: When disconnecting your boat battery, it’s essential to work in a well-ventilated space to prevent the buildup of hydrogen gas that can lead to an explosion. Proper ventilation also helps to dissipate the fumes that may cause respiratory problems or other health issues.
  3. Avoid Contact with Metal Surfaces: When handling your boat battery, avoid contact with metal objects that could create a short circuit. Metal tools or materials can cause sparks that can ignite the battery or surrounding combustible materials.

“Before disconnecting your boat battery, you should wear personal protective equipment, such as insulated gloves, safety glasses, or goggles, and appropriate clothing.”


By taking these precautions, you can ensure your safety and avoid accidents when disconnecting batteries on a boat. Always keep in mind the hazards that come with working around batteries, and be aware of the proper safety procedures to prevent risks to your health and the environment.

Locate the Battery and Identify the Positive and Negative Terminals

Before proceeding with disconnecting the boat battery, it is crucial to locate the battery and identify the positive and negative terminals.

The battery can be found in a variety of places depending on the type and size of the boat. It is typically located in a well-ventilated compartment to prevent any buildup of explosive gases. If you are unsure where the battery is located on your boat, consult the owner’s manual or seek assistance from a professional.

Identifying the positive and negative terminals is essential to ensure safe and proper disconnection. The positive terminal is typically marked with a “+” or red coloring, while the negative terminal is marked with a “-” or black coloring.

It is crucial to distinguish between the two terminals to prevent accidental short circuits. Using a wrench or pliers, loosen the nuts and bolts on each terminal to prepare for disconnection. Once you have located and identified the battery and its terminals, you are ready to proceed with disconnecting the boat battery.

Disconnect the Negative Terminal First

Now that we have successfully located the battery and identified the positive and negative terminals, it is time to begin the disconnection process. When disconnecting a boat battery, it is crucial to start with the negative terminal to avoid accidental short circuits.

To disconnect the negative terminal:

  1. Use a wrench or pliers to loosen the nut on the negative terminal clamp.
  2. Slide the clamp off the terminal, taking care not to touch any other metal parts of the boat.
  3. Wrap the terminal end in electrical tape or a protective cover to prevent it from touching any other metal surfaces.

It is essential to disconnect the negative terminal first because the boat’s electrical system is grounded to the negative battery terminal. If the positive terminal is disconnected first, it can create a live wire and lead to a short circuit or electrical shock.

Remember: When disconnecting the negative terminal, always loosen the nut on the clamp with a wrench or pliers and slide the clamp off the terminal. Never pull or twist the terminal to avoid damaging the wiring.

Disconnect the Positive Terminal

Now that the negative terminal is safely disconnected, it’s time to move on to the positive terminal. Using the same wrench or pliers, loosen the nut on the positive terminal and remove the cable carefully. Again, be sure to avoid any contact between the wrench and any metal surface.

It’s important to note that the positive terminal is typically marked with a plus sign (+) or the letters POS, or sometimes the color red. Before removing the positive terminal, make sure you’re fully aware of which terminal is positive and which is negative, to avoid any confusion.

Pro Tip: If you’re not certain which terminal is positive, consult your owner’s manual or check with a qualified marine mechanic.

Once the positive terminal is disconnected, you can move on to the final step in the disconnection process.

Insulate the Terminal Ends

After disconnecting the boat battery, it is crucial to insulate the terminal ends to protect them from corrosion and accidental contact. Failure to do so can result in damage to the battery and even electrical shock. To ensure the safety and longevity of your battery, follow these simple steps:

Using a clean rag, wipe the battery terminals to remove any dirt or debris.

Apply a thin layer of petroleum jelly to the terminals to prevent rusting and corrosion.

Using electrical tape or terminal covers, insulate the positive and negative terminals. This will prevent them from coming into contact with each other or any other metal surfaces, which could cause a short circuit.

Insulating the terminal ends is a quick and easy process that can save you a lot of trouble down the line. By taking the time to do it now, you can ensure that your boat battery stays in top shape for years to come.

Gather the Necessary Tools and Materials

Before removing a boat battery, it is important to gather all the necessary tools and materials. This will make the process easier and more efficient. Here’s what you’ll need:

Item Quantity
Adjustable wrench 1
Pliers 1
Insulated gloves 1 pair
Battery cleaning solution 1 bottle
Baking soda 1 box
Water 1 bucket

It is important to wear insulated gloves and other protective gear when working on a boat battery to prevent electrical shock and injury.

Also, be sure to have a suitable container or tray nearby for the battery and its parts, as well as a cleaning solution and baking soda to neutralize any acid spills that may occur during the battery removal process.

Now that you have all the tools and materials you need, you can move on to the next section to learn about the safety precautions to take before disconnecting a boat battery.

Reconnecting the Boat Battery

Now that the boat battery has been safely disconnected and stored, it’s time to reconnect it. Reconnecting a boat battery follows the reverse order of disconnection, starting with the positive terminal.

  1. First, ensure that the boat’s electrical system is turned off to prevent electrical shocks and damage to the battery.
  2. Connect the positive battery cable to the positive battery terminal.
  3. Tighten the positive cable clamp with a wrench, making sure it’s properly secured to prevent any loose connections.
  4. Next, connect the negative battery cable to the negative battery terminal.
  5. Tighten the negative cable clamp with a wrench, ensuring that it’s tightly secured.

It’s important to note that the battery terminals should be clean and free of corrosion before reconnecting the battery. If there’s any corrosion build-up, use a wire brush or battery terminal cleaner to remove it before reconnecting the battery.

Once the battery is reconnected, turn on the boat’s electrical system and check that everything is functioning correctly. If there are any issues, double-check all connections and make sure the battery is properly charged.

By following these steps for disconnecting and reconnecting a boat battery, boaters can ensure a safe and reliable journey out at sea. Remember to practice caution, wear protective gear, and properly store the battery to prolong its lifespan.

Conclusion

In conclusion, disconnecting a boat battery is a simple but essential process that every boater should know how to do. Proper battery disconnection not only ensures a safe and trouble-free journey but also extends the lifespan of your battery. By following the steps outlined in this article and taking proper safety precautions, you can easily disconnect and store your boat battery. Remember to insulate the terminals after disconnection, keep the battery in a cool, dry place during storage periods, and periodically check its charge level.

When it’s time to reconnect the battery, follow the reverse order of disconnection and make sure all connections are secure. Taking the time to properly disconnect and maintain your boat battery can save you time, money, and headaches in the long run.

Thank you for taking the time to read this article. I hope that it has been informative and helpful in guiding you through the process of safely disconnecting and maintaining your boat battery. Whether you’re a seasoned boater or just starting out, knowing how to properly handle your boat battery is an essential skill that can make your boating experience more enjoyable and stress-free.

FAQ’s about Disconnect Boat Battery

Why is disconnecting a boat battery important?

Disconnecting a boat battery is important to prevent electrical accidents, preserve battery life, and avoid discharge during storage periods.

What tools and materials do I need to disconnect boat battery?

You will need wrenches, pliers, insulated gloves, and other necessary tools for disconnecting a boat battery.

What safety precautions should I take when I disconnect boat battery?

It is important to wear protective gear, work in a well-ventilated area, and avoid contact with metal surfaces to ensure safety when disconnecting a boat battery.

How do I locate the boat battery and identify the positive and negative terminals?

To locate the boat battery and identify the terminals, refer to your boat’s manual or follow the battery cables to find the battery. The positive terminal is usually marked with a “+” symbol, and the negative terminal is marked with a “-” symbol.

Should I disconnect the negative terminal first?

Yes, it is recommended to disconnect the negative terminal first to avoid accidental short circuits.

How do I disconnect the positive terminal of the boat battery?

To disconnect the positive terminal, use a wrench or pliers to loosen the nut or bolt securing the cable to the terminal. Once loosened, carefully remove the cable from the terminal.

Why is it important to insulate the terminal ends?

Insulating the terminal ends helps protect them from corrosion and accidental contact, ensuring the longevity of the boat battery.

How should I store when I disconnect boat battery?

It is recommended to store the disconnected boat battery in a cool, dry place. Periodically checking its charge level during storage periods is also advisable.

How do I reconnect the boat battery?

To reconnect the boat battery, start by connecting the positive terminal first and then attach the negative terminal. Ensure that the connections are secure.


Stowing Your Boat Battery for Winter


As an Amazon Affiliate I earn from qualifying purchases. MarineBatteryGuide.com is a participant in the Amazon Services LLC Associates Program, an affiliate advertising program designed to provide a means for sites to earn advertising fees by advertising and linking to Amazon.com,

Links on this disconnect boat battery page are sponsored affiliate links and the owner makes commission if you buy after clicking these links. The owner is not a bona-fide user of disconnecting boat battery. However, he has thoroughly researched about how to disconnect boat battery and provided a personal opinion only. This disclosure is in accordance with the Federal Trade Commission’s 16 CFR, Part 255: “Guides Concerning the Use of Endorsements and Testimonials in Advertising.”

Solving Boat Battery Problems: A Comprehensive Guide

As a boat owner, having a reliable marine battery is essential for ensuring a smooth and safe sailing experience. Unfortunately, boat battery problems are a common occurrence and can quickly put a damper on your plans. Whether you’re dealing with a battery that won’t start, drains too quickly, or experiences corrosion, it’s crucial to understand the problem and implement the necessary solutions to maintain your battery’s health.

In this comprehensive guide, I will delve into various boat battery problems and provide solutions to help you troubleshoot common issues. We’ll explore the importance of proper maintenance, identify common problems, and offer step-by-step instructions to resolve them. By the end of this guide, you’ll have the knowledge and tools needed to keep your boat battery in excellent condition and avoid potential problems down the line.

boat-battery-problems.jpg

An investment of $27.00 for a solid marine battery maintenance and servicing program is a small price to pay for battery peace of mind

A stranded boat in the middle of a lake with a dead battery. The surrounding water is calm and blue, with no other boats in sight. The sun is setting, casting an orange and pink glow on the horizon. The boat’s owner is standing on the deck, looking frustrated and helpless. The battery is visible in the background, with its cables disconnected and corroded terminals.


Key Takeaways:

  • Boat battery problems are a common occurrence that every boat owner should be familiar with.
  • Proper maintenance practices can help prevent and resolve common boat battery problems.
  • Identifying and troubleshooting boat battery problems is crucial for ensuring a smooth and safe sailing experience.
  • By following the tips and techniques outlined in this guide, you can maximize your boat battery’s lifespan and avoid potential issues.
  • Regularly monitoring your boat battery’s voltage levels and taking steps to prevent drainage and corrosion can help maintain its health and performance.

Understanding Boat Battery Maintenance

As any boat owner knows, maintaining your boat’s battery is crucial for optimal performance and longevity. Neglecting proper maintenance can lead to a host of issues, from decreased battery life to potential safety hazards. Here, we will discuss the essentials of marine battery maintenance and how to keep your boat battery running smoothly.

The Importance of Marine Battery Maintenance

Proper maintenance is essential for extending the life of your marine battery and avoiding common problems, such as battery corrosion and drainage. As a boat owner, it is your responsibility to ensure that your battery is operating at the optimal voltage levels. Failure to do so can lead to battery failure and even damage to your boat’s electrical system.

Optimal Boat Battery Voltage Levels

The optimal voltage level for your boat battery will depend on the type of battery you have installed. Typically, most marine batteries operate at 12 volts, but certain models may require 24 volts or more. It is essential to check your boat’s manual or consult a professional to determine the correct voltage levels for your battery.

Once you have determined the optimal voltage levels, you will need to monitor your battery’s voltage regularly to ensure it’s functioning correctly. A digital voltmeter is a useful tool for measuring your battery’s voltage levels accurately. If your battery’s voltage falls below the recommended levels, it may be time to replace it.

Boat Battery Maintenance Tips

Keeping your boat battery in excellent condition requires regular maintenance. Here are some essential tips to ensure your battery runs smoothly:

  • Charge your battery regularly: Batteries lose their charge over time, so it’s essential to charge them regularly, especially during the off-season.
  • Keep your battery clean: Dirt and debris can cause corrosion and decrease your battery’s performance. It’s crucial to clean your battery regularly, ensuring the terminals are free from any buildup.
  • Check your battery’s water levels: Some batteries require regular water top-ups. Check your boat’s manual or consult a professional to determine if your battery requires water top-ups.
  • Store your battery correctly: When storing your boat, ensure that your battery is removed and stored in a cool, dry place.

By following these tips and monitoring your boat battery’s vital signs, you can avoid common problems and extend its overall lifespan.

“Neglecting proper boat battery maintenance can lead to decreased battery life and even potential safety hazards.”

Identifying Common Boat Battery Problems

When it comes to boat battery problems, two of the most common issues are a battery that won’t start and a battery that drains quickly. These can be frustrating and leave you stranded on the water if not resolved promptly. Let’s explore these problems in more detail and discuss potential causes and troubleshooting techniques.

Boat Battery Won’t Start

If your boat battery won’t start, there are a few possible reasons. One is a dead battery, which can occur if the battery isn’t being charged correctly or is past its lifespan. Another cause could be a faulty starter motor or solenoid.

Tip: To determine if your battery is dead, use a voltmeter to test the voltage. A fully charged battery should read around 12.6 volts.

If the battery is not the issue, then the starter motor or solenoid could be the culprit. A starter motor that’s failing may produce a clicking sound when you turn the key, or it may not produce any sound at all. A solenoid that’s faulty may cause the engine to turn over slowly or not at all.

Boat Battery Draining Quickly

If your boat battery is draining quickly, there are multiple causes. One common factor is leaving electronics running while the boat is not in use. Another possibility could be a parasitic draw, which is when there’s a constant power draw even when the boat is turned off.

Tip: To determine if there’s a parasitic draw, use an ammeter to measure the current being drawn by the battery with the boat turned off.

Other potential causes of a quickly draining battery include a faulty alternator, loose connections, or a damaged battery. It’s essential to troubleshoot the problem to pinpoint the exact cause and avoid recurring issues in the future.

Troubleshooting Boat Battery Not Holding a Charge

If you’re dealing with a boat battery that won’t hold a charge, don’t worry. There are several potential reasons why this could be happening, and in this section, I’ll guide you through troubleshooting and resolving this issue.

Step 1: Check Your Marine Battery Maintenance

The first step to take when dealing with a boat battery not holding a charge is to verify that your marine battery is properly maintained. Regular maintenance ensures that your battery operates efficiently and lasts as long as possible. Check if the battery is clean and free of debris and corrosion, and ensure that the battery terminals have no sulfation or corrosion buildup.

The following tips will help you maintain your marine battery:

  • Keep the battery clean, dry, and free of debris.
  • Check the battery terminals for any sulfation or corrosion build-up and clean them accordingly.
  • Ensure that the fluid levels are correct and top them up if needed (if applicable).
  • Store your battery in a dry, cool place.

Step 2: Test Your Battery

If your battery is well-maintained but still not holding a charge, the next step is to test it. You can use a digital multimeter to check if the battery is holding a charge or not. If the voltage level is below 12.4 volts, it means that the battery is not holding a charge.

If you don’t have a multimeter, you can take your boat battery to a mechanic or a boat dealer and have it tested professionally or use a load tester to see if it is able to hold a charge.

Step 3: Charge Your Boat Battery

If your boat battery is not holding a charge, it is essential to charge it properly. Ensure you’re using a quality marine battery charger that is compatible with your battery. Overcharging or undercharging your battery can cause damage and shorten its lifespan.

You can follow these steps to charge your boat battery:

  1. Disconnect your battery from the boat.
  2. Connect the charger to the battery – ensure the polarity is correct.
  3. Plug in the charger and turn it on.
  4. Allow the battery to charge fully.
  5. Disconnect the charger and reconnect the battery to the boat.

Step 4: Replace Your Boat Battery

If your boat battery still won’t hold a charge despite troubleshooting, it may be time to replace it.

You can extend the lifespan of your marine battery by maintaining it properly. However, if it’s over five years old or has been damaged, replacing it may be the only viable solution.

Remember that marine battery maintenance is crucial to keep it in excellent condition and to avoid common boat battery problems like this one.

Dealing with Boat Battery Corrosion

Corrosion can significantly impact your boat battery’s performance and lifespan. It occurs when a buildup of sulfate crystals accumulate on the lead plates in the battery, causing damage and reducing its overall capacity. In this section, we will delve into the causes of battery corrosion, share effective methods to prevent and remove it, ensuring your battery operates at its best.

What Causes Boat Battery Corrosion?

There are several causes of boat battery corrosion, including:

  • Excessive heat and vibration: High temperatures and constant jarring can cause the battery’s protective coatings to corrode.
  • Overcharging: Overcharging your battery can lead to the production of excess hydrogen and oxygen gases, leading to corrosion.
  • Undercharging: Undercharging your battery can cause acid stratification and the accumulation of sulfate crystals on the lead plates, leading to corrosion.
  • Poor maintenance: Failing to clean your battery regularly can allow dirt and debris to accumulate and cause corrosion.

By understanding the causes of corrosion, you can take steps to prevent it from occurring.

Methods for Preventing and Removing Corrosion

The following are some effective methods to prevent and remove corrosion from your boat battery:

  1. Regular cleaning: It’s important to clean your battery regularly to remove dirt and debris that can cause corrosion. Use a battery cleaner, a wire brush, and a cloth to clean the battery and terminals, ensuring that you wear protective gloves and glasses.
  2. Applying petroleum jelly: After cleaning, apply a thin layer of petroleum jelly to the battery terminals and connections to protect them from future corrosion.
  3. Using anti-corrosion washers: Anti-corrosion washers can be placed between the battery and its terminals to create a barrier against corrosion.
  4. Installing a battery box: A battery box can protect your battery from excessive heat and vibration, preventing corrosion from occurring.

By using these methods, you can prevent and remove corrosion from your boat battery, ensuring it operates efficiently and has a longer lifespan.

Extending Boat Battery Lifespan

Proper maintenance practices are essential to extend the lifespan of your boat battery. Here are some tips to help you keep your battery in excellent condition:

  1. Charge your battery regularly: It’s important to charge your boat battery after each use and during extended periods of inactivity. A fully charged battery will prevent sulfation, which can lead to permanent damage.
  2. Avoid overcharging: Overcharging your battery can lead to reduced lifespan and potential damage. Use a quality marine battery charger and avoid charging at high temperatures.
  3. Store your battery properly: When storing your boat battery, make sure it’s in a cool and dry place, away from direct sunlight and heat sources. Disconnect all cables and clean the battery terminals before storage.
  4. Perform regular maintenance: Inspect your boat battery regularly for signs of wear and tear, corrosion, and damage. Clean the terminals and cables, and replace damaged components promptly.

By implementing these maintenance practices, you can extend the lifespan of your boat battery and avoid common problems.

It’s also important to note that the lifespan of a boat battery will vary based on usage, storage conditions, and other factors. Typically, a marine battery will last between 2-5 years, but proper maintenance can extend its lifespan.

Maintaining Proper Boat Battery Voltage Levels

Proper voltage levels are crucial to maintaining your boat battery’s optimal performance. Failing to maintain these levels can result in irreversible damage to your marine battery.

To ensure proper voltage levels, you should measure your boat battery voltage periodically, using a voltmeter. The optimal voltage level for a fully charged marine battery is approximately 12.6 volts. Voltage levels can vary depending on the battery’s state of charge; therefore, it’s essential to check the voltage level during different charging stages.

How to Measure Boat Battery Voltage

To measure your boat battery voltage, you will need a voltmeter. Follow these steps:

  1. Turn off all electrical components on your boat, including lights, navigation equipment, and other electronics.
  2. Remove the battery cover and locate the positive and negative terminals.
  3. Insert the red lead of the voltmeter into the positive terminal and the black lead into the negative terminal.
  4. Read the voltage on the voltmeter.

If the voltage reading is below 12.2 volts, your battery may be partially discharged, and you need to recharge it.

Adjusting Boat Battery Voltage

If your boat battery voltage levels are not optimal, you may need to adjust them. Here are some steps to follow:

  1. Ensure all electrical components are turned off before adjusting voltage levels.
  2. Check the battery charger’s output voltage levels using a voltmeter.
  3. Adjust the output voltage level if necessary.
  4. Charge your boat battery until it reaches the optimal voltage level.

By following these simple steps, you can maintain your boat battery’s proper voltage levels and ensure optimal performance.

Preventing Boat Battery Drainage

There’s nothing more frustrating than a boat battery that drains faster than it should. Not only is it inconvenient, but it can also lead to more serious problems. In this section, I will explore potential causes of battery drainage and offer practical solutions to prevent this issue from recurring.

Possible Causes of Battery Drainage

There are several reasons why your boat battery may be draining faster than expected:

  • Parasitic draw: This refers to a small, continuous draw of power from the battery even when the boat’s electrical systems are turned off. Examples may include clocks, alarms, and electronic control modules.
  • Faulty wiring or connections: Poor wiring or connections can lead to a significant power drain, particularly if there are loose or corroded connections.
  • Overuse of electronics: Running multiple electronics simultaneously or leaving them on for extended periods can significantly drain your battery.

Preventing Battery Drainage

Fortunately, there are steps you can take to prevent battery drainage:

  • Minimize parasitic draw: If possible, disconnect any electronics that continuously draw power when not in use. You can also install a battery switch to turn off power to these devices.
  • Check wiring and connections: Regularly inspect the wiring and connections in your boat’s electrical system to ensure there are no loose or corroded connections.
  • Limit electronics use: Be mindful of which electronics you are using and how long they are turned on. Consider turning off non-essential electronics when not in use.

By taking these preventative measures, you can avoid battery drainage and ensure a reliable power source for your boat.

“A drained battery can lead to serious problems while out on the water, but with proper maintenance and care, you can avoid this issue altogether.”

Troubleshooting Boat Battery Problems: Safely Charging Your Boat Battery

To ensure your boat battery’s optimal health and performance, it’s crucial to charge it correctly. Whether you’re facing a boat battery not holding a charge or experiencing other issues, proper charging techniques are essential. In this section, we will guide you through the steps to safely charge your marine battery.

Before proceeding with charging, ensure that the battery is disconnected from the boat’s electrical system.

Step 1: Choose the Right Charger

The first step is to choose the right charger for your boat battery. It’s essential to consider the battery type, voltage, and amperage capacity to select the right charger that meets its specific needs. A high-quality marine battery charger will prolong the life of your battery and prevent any damage.

Step 2: Connect the Battery to the Charger

Ensure that the battery and charger are both placed in a well-ventilated area. Connect the charger’s red clamp to the battery’s positive terminal (marked with a + sign) and the black clamp to the negative terminal (marked with a – sign).

Step 3: Set the Charger

Depending on the charger model, set the charger to the correct voltage and amperage capacity. Many chargers have an automatic setting, which detects the battery type and adjusts the charging accordingly.

Step 4: Start Charging

Once the charger is connected and set up correctly, it’s time to start charging. Ensure that the charger is plugged in and turned on, and check that the charger’s display indicates that the battery is charging. The charging process may take several hours, depending on the battery’s condition and capacity.

Step 5: Charging Complete

Once the battery is fully charged, turn off the charger and unplug it from the power source. Remove the black clamp from the battery’s negative terminal first, followed by the red clamp from the positive terminal. Reconnect the battery to your boat’s electrical system, ensuring all connections are tight and secure.

By following these safe and effective charging techniques, you can avoid common boat battery problems and keep your marine battery in top condition.

Additional Tips for Marine Battery Maintenance

Proper maintenance is crucial for ensuring your boat battery’s optimal performance and longevity. Here are some additional tips and best practices to keep your marine battery in excellent condition:

  1. Keep your battery clean: Regularly clean your battery’s terminals and surrounding area with a mixture of baking soda and water to remove any buildup or corrosion. Rinse with clean water and dry.
  2. Check your battery’s water levels: If your marine battery requires distilled water, check the levels regularly and top up if necessary. Use a hydrometer to measure the specific gravity of the electrolyte solution to ensure proper levels.
  3. Store your battery correctly: During periods of non-use, store your battery in a cool, dry place and keep it charged. Avoid storing it on concrete or metal surfaces to prevent discharge.
  4. Use a battery charger: Regularly charging your marine battery with a compatible charger can prolong its lifespan and ensure optimal performance.
  5. Invest in a battery monitor: Installing a battery monitor on your boat can help you keep track of your battery’s performance and health. This can alert you to any potential problems and allow you to take corrective action.
  6. Follow manufacturer guidelines: Always refer to your marine battery’s manufacturer guidelines for specific maintenance instructions and recommendations.

By implementing these additional tips and combining them with the previous sections’ advice, you can stay on top of common boat battery problems and keep your marine battery operating at its best.

Conclusion

Throughout this comprehensive guide, I have provided solutions to various boat battery problems. By implementing the proper maintenance techniques, troubleshooting common issues, and following the tips shared in this guide, you can ensure a reliable and long-lasting boat battery.

Problems with boat batteries can be frustrating and even dangerous, but with the information provided in this guide, you can now navigate these issues with ease. Remember to keep your battery properly maintained, monitor its voltage levels, and prevent drainage to avoid common problems.

Thank you for reading this guide on solving boat battery problems. I hope that this guide has been informative and helpful in resolving any issues you may have had with your marine battery.

Always keep in mind that boat battery problems can arise from time to time, even with proper maintenance. I recommend that you stay vigilant, monitor your battery regularly, and address any issues as soon as possible to avoid further complications.

Remember: A little preventive maintenance can save you time, money, and hassle in the long run.

Thank you again for reading, and good luck with your boat battery maintenance!

FAQ’s about boat battery problems: 

What are some common boat battery problems?

Some common boat battery problems include a battery not holding a charge, excessive battery drainage, and battery corrosion.

How can I troubleshoot a boat battery not holding a charge?

To troubleshoot a boat battery not holding a charge, you can check the battery connections, test the battery voltage, and ensure proper charging practices are being followed.

How can I prevent boat battery corrosion?

To prevent boat battery corrosion, you can use anti-corrosion sprays, regularly clean the battery terminals, and ensure proper ventilation in the battery compartment.

Why is my boat battery draining quickly?

There can be several reasons for a boat battery draining quickly, including electrical system issues, parasitic draws, or a faulty battery. It’s important to identify the underlying cause for effective troubleshooting.

How can I extend the lifespan of my boat battery?

To extend the lifespan of your boat battery, you can practice proper maintenance such as regular charging, avoiding deep discharges, and keeping the battery clean and dry when not in use.

What should be the proper voltage levels for a boat battery?

The proper voltage levels for a boat battery should typically be around 12.6 to 12.8 volts when fully charged. It’s important to monitor and maintain these levels for optimal performance.

How do I safely charge my boat battery?

To safely charge your boat battery, you should use a suitable charger with the correct charging settings, ensure proper ventilation, and follow the manufacturer’s guidelines for charging procedures.

Are there any additional tips for boat battery maintenance?

Yes, some additional tips for boat battery maintenance include regularly inspecting the battery for damage, using a battery maintainer during periods of inactivity, and avoiding overloading your boat’s electrical system.


Boat Maintenance and Service Schedule is Critical

West Marine


MarineBatteryGuide.com is a participant in the Amazon Services LLC Associates Program, an affiliate advertising program designed to provide a means for sites to earn advertising fees by advertising and linking to Amazon.com,

Links on this boat battery problems page are sponsored affiliate links and the owner makes commission if you buy after clicking these links. The owner is not a bona-fide user of boat battery problems products. However, he has thoroughly researched boat battery problems and provided a personal opinion only. This disclosure is in accordance with the Federal Trade Commission’s 16 CFR, Part 255: “Guides Concerning the Use of Endorsements and Testimonials in Advertising.”

Understanding Boat Battery Voltage

Hello and welcome to my guide on monitoring boat battery voltage. I understand the importance of maintaining a boat battery’s health and longevity.

In this section, I will provide essential tips on how to effectively monitor the voltage of your boat battery and keep your electrical system running smoothly.

boat-battery-voltage-manual.jpgMonitoring boat battery voltage is crucial for identifying potential issues before they become major problems. By following these suggestions, you can ensure the functionality and lifespan of your boat’s electrical system, keeping you safe and prepared during your boating adventures.

The Marine Battery Guide

Key Takeaways:

  • Regularly monitoring boat battery voltage is essential for maintaining a healthy electrical system.
  • Effective monitoring techniques and best practices can help keep your boat battery performance at optimal levels.
  • Choosing a reliable battery voltage monitor can help you keep track of your battery’s health and lifespan.
  • Interpreting voltage readings correctly is necessary for assessing the health of your boat battery and electrical system.
  • Maintaining proper battery charging techniques is crucial for maximizing voltage levels and overall battery health.

Understanding Boat Battery Voltage

As a boat owner, understanding marine battery voltage is essential for maintaining the health of your vessel’s electrical system. The boat’s electrical system relies heavily on battery voltage, which powers everything from lights to navigation equipment.

Marine batteries typically have a voltage rating of 12 volts, with some boats using multiple batteries to increase voltage and capacity. The voltage of a battery refers to the electrical potential difference between its positive and negative terminals. A fully charged marine battery should read around 12.6 to 12.8 volts.

It’s important to note that a battery’s voltage can fluctuate depending on various factors, such as temperature, usage, and age. These fluctuations can impact the performance of your boat’s electrical system and should be monitored regularly to ensure optimal functionality.

When discussing boat electrical systems, it’s essential to understand the concept of amperage, which refers to the flow of electrical current. Voltage and amperage work together to power your boat’s electrical components, with voltage providing the electrical potential, and amperage supplying the current to make it work.

In summary, marine battery voltage is vital for the overall health of your boat’s electrical system, and understanding its role is the first step to effective monitoring and maintenance.

The Importance of Monitoring Battery Voltage

One of the most crucial steps in ensuring the longevity and functionality of your boat’s electrical system is monitoring your boat battery voltage regularly. By doing so, you can detect potential issues early on and take corrective measures to prevent them from escalating.

Boat Battery Troubleshooting

Failure to monitor your boat battery voltage can lead to a host of problems, such as battery damage, electrical equipment malfunction, and engine failure. In the absence of a proper monitoring system, you may not know that your boat battery is losing power until it’s too late, resulting in costly repairs.

“A dead battery can leave you stranded in the middle of the ocean, which is the last place you want to be.”

To avoid such scenarios, it is imperative to include battery voltage monitoring as part of your routine boat maintenance. Regularly checking your boat battery voltage allows you to detect minor issues before they become major problems, saving you time, money, and stress in the long run.

Boat Battery Charging

Another reason why monitoring boat battery voltage is crucial is that it helps optimize the charging process. Monitoring voltage levels enables you to understand when your battery requires charging and when to stop charging. Overcharging your battery can significantly reduce its lifespan and lead to permanent damage. Conversely, undercharging can leave your battery without enough power to function efficiently, shortening its lifespan.

By tracking your boat battery voltage, you can ensure that you charge it correctly and prolong its lifespan. A good rule of thumb is to charge the battery when it’s around 50% full and stop charging when it reaches 90-95% capacity.

As you can see from the graph above, charging your boat battery beyond its capacity can cause significant damage. On the other hand, consistent undercharging can lead to sulfation, wherein sulfate crystals form on the battery plates, reducing its ability to hold a charge over time.

In conclusion, monitoring boat battery voltage is essential for troubleshooting battery-related issues, optimizing the charging process, and ensuring the longevity and reliability of your boat battery. Neglecting this critical aspect of boat maintenance can result in costly repairs, premature battery failure, and a host of other issues that can ruin your boating experience. Take the time to monitor your boat battery voltage regularly and enjoy smooth sailing for years to come.

Choosing a Battery Voltage Monitor

A reliable battery voltage monitor is crucial for effectively monitoring your boat battery’s health and ensuring its longevity. With a vast range of monitoring systems available in the market, selecting an appropriate monitor can be challenging. Consider the following factors to choose the right battery voltage monitor for your boat:

Factor Description
Battery Type Ensure that the monitor is compatible with your boat’s battery type, including AGM, flooded, or gel.
System Voltage The monitor should be suitable for your boat’s voltage system, such as 12V or 24V.
Accuracy Choose a monitor with a high level of accuracy to obtain precise readings.
Alerts and Warnings An ideal monitor should offer alerts and warnings for low voltage, overvoltage, or other potential issues.
Display Consider the monitor’s display type, size, and readability, ensuring it is easily legible in any lighting conditions.
Price Determine your budget keeping in mind the quality and features of the monitor.

Once you have chosen a suitable battery voltage monitor, install it in an easily accessible location where you can read the monitor’s readings. Regularly check the monitor’s readings to monitor your boat battery’s health and optimize its lifespan.

Monitoring Techniques and Best Practices

Properly monitoring your boat battery voltage is crucial for maintaining its health and maximizing its lifespan. Here are some essential techniques and best practices to follow:

  • Measure voltage regularly: Checking your boat battery voltage on a regular basis is vital for identifying potential issues and taking appropriate actions. Ideally, you should measure the voltage weekly.
  • Use a voltage monitor: A reliable voltage monitor can help you keep track of your boat battery health. Choose a monitor that is compatible with your battery type and provides accurate readings.
  • Monitor under-load voltage: Measuring battery voltage under-load is important as it reflects the actual voltage while the battery is in use. To do this, turn on the boat’s electrical components and measure the voltage.
  • Check for voltage drops: Voltage drops can occur due to various factors, including corrosion or loose connections. To check for voltage drops, measure the voltage at the battery terminals and compare it with the voltage at the electrical device’s terminals.
  • Keep your battery clean: Regularly cleaning your battery terminals and cables can help maintain optimal voltage levels. Use a wire brush and baking soda solution to clean any corrosion or buildup.
  • Avoid overcharging: Overcharging your boat battery can reduce its health and lifespan. Use a smart charger or monitor the battery during charging to avoid overcharging.

By following these monitoring techniques and best practices, you can ensure your boat battery voltage remains at optimal levels, prolonging its lifespan and ensuring uninterrupted power while out at sea.

Interpreting Voltage Readings

Interpreting voltage readings is an essential part of monitoring boat battery health and maintaining optimal boat electrical system performance. By understanding what voltage readings represent, you can identify potential battery issues and take appropriate actions to prevent more significant problems.

When monitoring boat battery voltage, it’s essential to keep in mind that the voltage readings indicate the level of charge in the battery. A fully charged boat battery should have a voltage reading between 12.6 and 12.8 volts. As the battery discharges, the voltage decreases, indicating that the battery is losing charge.

It’s worth noting that readings can vary slightly depending on the type of boat battery you have. Consult your boat owner’s manual for specific information on the type of battery used in your craft.

When interpreting voltage readings, it’s essential to check the readings under different conditions. For example, take measurements when the battery is fully charged and after use to assess the battery’s state of charge (SoC). Comparing the voltage readings for these different conditions can help you determine your battery’s capacity and health.

It is also essential to check the voltage readings for each battery cell. If you find that the readings for any cell are significantly different from the others, it could indicate a problem with that cell. In this case, it is recommended to seek professional assistance to determine the best course of action.

Using a Voltmeter

Using a voltmeter is a common way to measure boat battery voltage. To use a voltmeter, set it to the DC voltage range and connect the positive and negative leads to the corresponding battery terminals. The voltmeter will display the voltage reading of the battery.

Be sure to follow the manufacturer’s instructions when using your voltmeter, as improper use could damage your battery or the voltmeter itself.

Tip: Regular monitoring of boat battery voltage using a voltmeter can help prevent battery failure and prolong the lifespan of your boat’s electrical system.

Troubleshooting Battery Voltage Fluctuations

As a boat owner, you may encounter voltage fluctuations in your boat electrical system. These fluctuations can cause several issues, from battery failure to stalled engines. Therefore, it is crucial to address voltage fluctuations efficiently. In this section, I will discuss common causes of voltage fluctuations and provide troubleshooting tips to rectify them.

Common Causes of Voltage Fluctuations

Voltage fluctuations can stem from various factors, including:

  • Loose battery connections
  • Corroded battery terminals
  • Malfunctioning alternators
  • Damaged wiring

These factors can cause the battery voltage to fluctuate regularly or drop unexpectedly. As a result, your boat’s electrical system may not function correctly or even shut down altogether.

Troubleshooting Battery Voltage Fluctuations

If you notice voltage fluctuations in your boat electrical system, consider these tips:

  1. Check the battery connections: Verify that the battery terminals and cable connections are clean, tight, and corrosion-free.
  2. Inspect the alternator: Ensure the alternator belt is tight, and the alternator is functioning correctly. Consider testing the alternator output with a multimeter.
  3. Examine the wiring: Inspect the wiring to identify any damages, breakages, or loose connections.
  4. Monitor the battery voltage: Using a battery voltage monitor, track the battery voltage levels to identify regular fluctuations or unexpected drops.
  5. Replace the battery: If the battery is damaged, the voltage fluctuations may be a sign of a dying battery. Consider replacing it with a new one.

By following these troubleshooting tips, you can identify the underlying cause of voltage fluctuations and take appropriate actions to fix them.

Final Thoughts

Voltage fluctuations are a common issue in boat electrical systems. However, overlooking their importance can have severe consequences. By monitoring your boat’s battery voltage and following the troubleshooting tips discussed in this section, you can maintain the health of your boat electrical system and ensure uninterrupted power during your boating adventure.

Battery Charging Techniques for Optimal Voltage

Proper charging techniques are essential to maintain optimal voltage levels, ensuring that your boat battery functions efficiently and lasts as long as possible. Below are some charging techniques that can help maximize voltage and overall battery health:

  • Choose the right charger: Ensure that the charger you use is compatible with your boat battery’s chemistry, voltage, and capacity. Using an incorrect charger can lead to overcharging or undercharging, resulting in reduced battery life and performance.
  • Charge at the right voltage: Charging your battery at the correct voltage is essential to optimize its lifespan and performance. Consult your battery manual or a professional to determine the right charging voltage for your battery.
  • Monitor charging progress: Keep a close eye on your battery’s charging progress, and disconnect the charger once it reaches full capacity. Overcharging beyond full capacity can damage the battery and reduce its lifespan.
  • Avoid deep discharging: Try to avoid fully draining your boat battery, as it can shorten its lifespan. Consider investing in a battery monitor to track your battery’s state of charge and prevent deep discharging.

Charging Methods

There are several methods to charge your boat battery, each with its own pros and cons:

Charging Method Pros Cons
Trickle Charging Slow and steady charging that helps maintain battery life. Not ideal for quickly recharging a severely depleted battery.
Rapid Charging Quick and efficient charging, ideal for getting back on the water quickly. Can cause battery temperature to rise, leading to reduced lifespan and performance.
Float Charging Continuously maintains battery voltage at a safe level, ideal for long-term storage. Can lead to overcharging when used for extended periods, reducing battery lifespan.

Consult your battery manual or a professional to determine which charging method is best suited for your battery and usage needs.

By following the right charging techniques and selecting the appropriate charging method, you can ensure that your boat battery remains healthy and functional for longer. Remember to monitor your battery’s voltage regularly, maintain optimal charging levels, and avoid deep discharging to prolong your battery’s lifespan.

Maintaining a Healthy Boat Battery

To ensure your boat battery remains in excellent condition, regular maintenance is critical. With proper care, your battery can last longer and provide reliable power throughout your boating trips. Here are a few essential tips for maintaining a healthy boat battery:

  • Keep it clean: Dirt and debris can accumulate on your battery’s surface, potentially causing voltage fluctuations or short circuits. Regularly clean your battery using a mixture of baking soda and water, then rinse and dry thoroughly.
  • Check fluid levels: If your battery has removable caps, check the fluid levels periodically. Always use distilled water to top up the battery, never tap water.
  • Secure it: Ensure your battery is securely fastened in place, with no loose connections or vibrations that could damage the battery or electrical system.
  • Monitor for signs of damage: Regularly inspect your battery for signs of corrosion, leaks, or cracks. If you notice any of these issues, replace your battery immediately.
  • Charge it correctly: Use a quality battery charger specifically designed for marine batteries. Avoid overcharging or undercharging your battery, as this can damage its health and shorten its lifespan.

By following these maintenance tips, you can keep your boat battery in top condition and ensure its longevity. A healthy battery not only means uninterrupted power during your boating adventures, but it also ensures a safe, reliable electrical system for your vessel.

Conclusion

In conclusion, effective monitoring of boat battery voltage is crucial for ensuring a functional and reliable electrical system. By understanding marine battery voltage and the importance of monitoring, troubleshooting, charging, and maintenance, you can maximize your boat battery’s lifespan and performance.

Remember, a reliable battery voltage monitor is essential for accurately measuring voltage levels. Regularly monitoring and interpreting voltage readings can help identify potential issues and ensure optimal battery health. In case of voltage fluctuations, troubleshooting techniques can help rectify the problem.

Proper charging techniques and regular maintenance practices are equally important for prolonging the lifespan of your boat battery. By following the key tips and best practices discussed in this article, you can enjoy uninterrupted power on your boating journeys.

Thank you for reading and I hope these insights on monitoring boat battery voltage have been helpful. Happy boating!

FAQ

How often should I monitor my boat battery voltage?

It is recommended to monitor your boat battery voltage on a regular basis, ideally once a month or before each boating trip.

What voltage range is considered healthy for a boat battery?

A healthy boat battery typically falls within the voltage range of 12.5 to 12.8 volts when fully charged.

How can I measure the voltage of my boat battery?

You can measure the voltage of your boat battery using a digital multimeter or a battery voltage monitor specifically designed for marine batteries.

What can cause voltage fluctuations in a boat battery?

Voltage fluctuations in a boat battery can be caused by factors such as excessive loads, faulty electrical connections, sulfation, or a failing alternator.

How can I troubleshoot voltage fluctuations in my boat battery?

To troubleshoot voltage fluctuations, start by checking the connections, load, and charging system. Clean any corroded connections, reduce excessive loads, and test the alternator’s output.

What are the best practices for maintaining a healthy boat battery?

To maintain a healthy boat battery, you should regularly clean the terminals, keep the battery properly charged, avoid over-discharging, and store it in a cool and dry location when not in use.

How long does a boat battery typically last?

The lifespan of a boat battery can vary depending on usage, maintenance, and other factors. On average, a well-maintained marine battery can last between 3 to 5 years.

The Marine Battery Guide

Boat Battery Voltage Chart

As an Amazon Affiliate I earn from qualifying purchases. MarineBatteryGuide.com is a participant in the Amazon Services LLC Associates Program, an affiliate advertising program designed to provide a means for sites to earn advertising fees by advertising and linking to Amazon.com,

Links on this boat battery voltage page are sponsored affiliate links and the owner makes commission if you buy after clicking these links. The owner is not a bona-fide user of boat battery voltage. However, he has thoroughly researched marine battery voltage and provided a personal opinion only. This disclosure is in accordance with the Federal Trade Commission’s 16 CFR, Part 255: “Guides Concerning the Use of Endorsements and Testimonials in Advertising.”

Boat Battery Replacement – Ensure a Smooth Process

As a boating enthusiast, you understand the importance of a reliable boat battery. Whether you’re cruising the open water or fishing in a quiet lake, an efficient and functional boat battery is crucial to powering your boat’s electrical systems and ensuring a seamless boating experience.

boat-battery-replacement.jpg

An investment of $27.00 for a solid marine battery maintenance and servicing program is a small price to pay for battery peace of mind

However, boat batteries don’t last forever, and when it’s time for a replacement, it’s essential to perform the task with care and precision to avoid complications and ensure optimal performance. In this section, I will provide an expert guide on boat battery replacement, covering the easy steps to ensure a smooth process.

The Marine Battery Guide

Key Takeaways

  • Replacing your boat battery is crucial for optimal performance and a seamless boating experience.
  • Performing the task with care and precision is essential to avoid complications.
  • Following easy steps can ensure a smooth process for boat battery replacement.
  • A reliable boat battery is essential for powering your boat’s electrical systems.
  • Regular maintenance and care can extend the lifespan of your boat battery.

Importance of Boat Battery Maintenance

Proper maintenance is critical for the longevity and optimal performance of your boat battery. Neglecting your battery could result in decreased efficiency, shortened lifespan, and potential safety hazards. Here are some essential tips to keep your battery in good condition:

  • Regular inspection: Check your battery often for any signs of corrosion, leaks, or damage to the cables or terminals.
  • Cleanliness: Keep your battery clean and dry, and wipe away any accumulated dirt or grime. Use a wire brush to clear away any corrosion on the terminals.
  • Charging: Charge your battery regularly to maintain its charge level. Avoid overcharging, and never let your battery sit in a discharged state for an extended period.
  • Safe Storage: Store your battery in a cool, dry, and well-ventilated location. Avoid exposing it to extreme temperatures or any sources of ignition.

Consistent boat battery maintenance will not only prevent unexpected issues but also extend the life of your battery, saving you the time and cost of frequent replacements.

Choosing the Best Boat Batteries

Choosing the right boat battery is essential for optimal performance on the water. The best boat batteries are durable, reliable, and can withstand the harsh marine environment. Here are some factors to consider when selecting the best boat batteries:

Battery Type

There are several types of boat batteries, including flooded, AGM, and gel. Flooded batteries are the most common and affordable, but require regular maintenance and venting. AGM batteries are maintenance-free, have higher cold-cranking amps, and are ideal for boats with limited ventilation. Gel batteries are also maintenance-free and have a longer lifespan than flooded or AGM batteries, but are more expensive.

Battery Capacity

The battery capacity, measured in ampere-hours (Ah), indicates how long the battery can run without recharging. Consider the power requirements of your boat’s accessories and electronics to determine the appropriate battery capacity. It’s better to choose a battery with higher capacity than required to avoid running out of power on the water.

Compatibility

Ensure that the boat battery is compatible with your boat’s electrical system and charging method. Some boat batteries are designed for specific types of boats and engines. Check the manufacturer’s recommendations or consult with a professional for guidance on the best boat battery for your vessel.

Popular Boat Battery Brands

There are many reputable boat battery brands, but some of the most popular brands include:

Brand Name Features
Optima AGM technology, maintenance-free, high cold-cranking amps
Interstate Multiple types of batteries, durable, reliable
Exide Wide range of batteries, affordable, long lifespan

Choosing the best boat batteries can seem overwhelming, but by considering these factors and consulting with a professional, you can be confident in your selection. Remember, investing in a high-quality boat battery can save you money and ensure a safer and more enjoyable boating experience.

The Marine Battery Guide

Boat Battery Buying Guide

Buying a boat battery can be a daunting experience, especially for first-time boat owners. However, by considering a few essential factors, you can find the right boat battery that suits your needs. In this boat battery buying guide, I will take you through the most critical aspects to help you select the best boat battery.

Battery Type

When it comes to boat batteries, two primary types are available: starting and deep-cycle batteries. Starting batteries produce a high amount of power in a short time and are ideal for starting your boat’s engine. On the other hand, deep-cycle batteries deliver consistent power over an extended period, making them suitable for powering your boat’s trolling motor and electronics. It’s essential to determine which type of battery your boat requires to avoid accidentally buying the wrong type.

Capacity

Boat battery capacity is measured in ampere-hours (Ah). It determines how long the battery will run before needing to recharge. The higher the battery’s capacity, the more power it can store, and the longer it will operate between charges. As a general rule, choose a battery with a capacity that matches or exceeds your boat’s power demands.

Compatibility

Compatibility is a crucial factor in selecting a boat battery. Ensure that the battery you choose is compatible with your boat’s electrical system. Mismatched batteries can lead to damage to your boat’s electrical system or equipment failure. Check your boat manual for specific battery requirements or consult with a marine expert.

Battery Brand

There are several boat battery brands to choose from, and it can be challenging to decide which one to go for. Research popular boat battery brands and read reviews from other boat owners. Look for a brand that is reputable, reliable, and offers excellent customer service. Avoid low-quality batteries as they may not last long and can be a waste of money in the long run.

Price

Cost is a significant consideration when buying a boat battery. Prices vary across different brands and models, but don’t let price be the only deciding factor. A low-priced battery may be tempting, but it may not be the best investment if it lacks quality and durability. Similarly, an expensive battery may not necessarily offer better performance than a moderately priced one. Evaluate your budget and balance it with the battery’s quality and features.

“Choosing the right boat battery can make a difference between a smooth sailing experience or a nightmare on the water.”

By following this boat battery buying guide, you can make an informed decision when purchasing a battery for your boat. Consider the battery type, capacity, compatibility, brand, and price to ensure a reliable and durable battery that will power your boating adventures for seasons to come.

Boat Battery Installation Steps

Proper installation of your boat battery is crucial for its efficient operation. Here are the easy steps to follow:

  1. Choose a suitable location for the battery: The ideal spot should be well-ventilated and dry. Ensure that it’s away from any heat sources such as the engine or exhaust.
  2. Disconnect the negative cable: This ensures that no electricity is flowing through the system during installation.
  3. Prepare the battery: Ensure that the battery is clean and free of any debris. Check the water level and, if necessary, fill it with distilled water up to the recommended level. Also, remove the caps and apply a small amount of petroleum jelly or battery terminal protector to the terminals to prevent corrosion.
  4. Connect the cables: First, connect the positive cable to the positive terminal of the battery. Then, connect the negative cable to the negative terminal of the battery.
  5. Secure the battery: Use a battery hold-down strap or bracket to secure the battery in place.
  6. Check the connections: Ensure that all connections are tight and secure.
  7. Reconnect the negative cable: Reconnect the negative cable to the battery negative terminal.
  8. Test the battery: Turn on the boat and check that the battery is functioning correctly.

It’s important to note that if you are not confident in your ability to install the battery, it’s best to seek the help of a professional to avoid any damage or malfunctions.

Boat Battery Care and Tips

Proper care and maintenance of your boat battery is essential to ensure long-term performance and avoid safety hazards. Here are some essential boat battery care and maintenance tips to keep your boat battery in top condition:

Charging Your Boat Battery

Charging your boat battery correctly is crucial for its longevity. Always use a compatible charger and follow the manufacturer’s instructions. Avoid overcharging or undercharging your battery, as it can damage its cells and shorten its lifespan.

It is also recommended to charge your battery after each use to prevent it from discharging completely. If you plan to store your boat battery for an extended period, make sure to charge it fully before storage and recharge it every three months to maintain its charge level.

Cleaning Your Boat Battery

Regular cleaning of your boat battery terminals can prevent corrosion and extend its lifespan. You can use a mixture of baking soda and water to clean the terminals and remove any buildup or residue. Make sure to disconnect your battery from the boat before starting any cleaning procedures.

Additionally, avoid exposing your boat battery to extreme temperatures or direct sunlight, as it can damage its cells and affect its performance. Always store your boat battery in a cool, dry place away from any flammable materials or sources of ignition.

Checking Your Boat Battery

Regular checks of your boat battery can help detect any issues or problems before they worsen. You can use a battery tester or multimeter to measure its voltage and determine its charge level. If you notice any signs of swelling, leaks, or damage to your battery, it is recommended to replace it immediately.

The Marine Battery Guide

Do’s and Don’ts of Boat Battery Care and Maintenance

Do’s Don’ts
  • Use a compatible charger to charge your battery
  • Clean your battery terminals regularly
  • Store your battery in a cool, dry place
  • Check your battery regularly for any signs of damage or malfunctioning
  • Overcharge or undercharge your battery
  • Expose your battery to extreme temperatures or direct sunlight
  • Store your battery near flammable materials or sources of ignition
  • Ignore any signs of damage or malfunctioning in your battery

By following these boat battery care and maintenance tips, you can ensure optimal performance and longevity for your boat battery, enhancing your boating experience and ensuring safety on board.

Common Boat Battery Issues and Troubleshooting

Boat batteries are essential for powering your boating adventures, but issues can arise, causing frustration and disruption to your plans. In this section, I will discuss common boat battery issues and provide troubleshooting tips to help you diagnose and resolve them.

Issue #1: Dead Battery

A dead battery is a common problem that can occur due to several factors, including leaving the battery uncharged for an extended period, a faulty charging system, or a parasitic load on the battery. If you experience a dead battery, follow these steps:

  1. Use a multimeter to test the voltage of the battery.
  2. If the voltage is below 12 volts, charge the battery using a proper charger or jump it using another battery.
  3. If the voltage is above 12 volts, check the charging system and rectify any issues.

Issue #2: Low Battery Voltage

Low battery voltage can lead to poor performance and ultimately cause battery failure. Several factors can contribute to low battery voltage, including overuse, a faulty charging system, or a parasitic load. If you experience low battery voltage, follow these steps:

  1. Check the water level and refill as necessary.
  2. Use a multimeter to test the voltage of the battery.
  3. If the voltage is below 12 volts, charge the battery using a proper charger or jump it using another battery.
  4. If the voltage is above 12 volts, check the charging system and rectify any issues.

Issue #3: Battery Sulfation

Battery sulfation occurs when the battery is left uncharged for an extended period, causing the lead-acid compounds to combine with the sulfuric acid, forming sulfate crystals on the battery plates. Sulfation can lead to decreased battery performance and ultimately cause battery failure. If you suspect sulfation, follow these steps:

  1. Use a hydrometer to measure the specific gravity of the electrolyte.
  2. If the specific gravity is below the recommended level, charge the battery using a proper charger or jump it using another battery.
  3. If the specific gravity does not improve after charging the battery, add a desulfator solution to the battery and charge it again.

“Regular maintenance and proper usage can prevent most common boat battery issues.”

Issue #4: Corroded Terminals

Corroded terminals can impede proper battery function, causing poor performance. Corrosion is usually caused by a combination of moisture, heat, and battery acid. If you experience corroded terminals, follow these steps:

  1. Use a wire brush to remove any corrosion from the terminals.
  2. Apply a coating of anti-corrosion spray to the terminals.
  3. Tighten the terminal connections securely.

Regular maintenance and proper usage can prevent most common boat battery issues. By following these simple troubleshooting tips, you can keep your boat battery functioning efficiently and enjoy uninterrupted boating adventures.

Maximizing Boat Battery Lifespan

Proper maintenance and care can prolong the lifespan of your boat battery. Here are some expert tips to help you maximize your boat battery lifespan:

Charge your battery correctly

Overcharging or undercharging your battery can result in reduced lifespan and performance. Use a quality marine battery charger and follow the manufacturer’s instructions for charging your battery. Avoid frequently discharging your battery below 50% capacity, as this can also impact its lifespan.

Keep your battery clean and dry

Frequent exposure to moisture, dirt, and debris can damage your boat battery. Clean your battery regularly with a damp cloth, avoiding excessive water or harsh chemicals. Ensure the battery is dry before reinstallation.

Store your battery properly

When not in use, store your boat battery in a cool, dry place, such as a garage or storage unit. Avoid storing your battery in extreme temperatures or direct sunlight, as this can reduce its lifespan and performance.

Perform regular maintenance

Regular maintenance can help prevent issues and prolong the lifespan of your boat battery. Check the battery’s fluid levels regularly and top up with distilled water as needed. Inspect the battery terminals and cables for corrosion, cleaning them with a wire brush and terminal cleaner if necessary.

Consider investing in a battery monitor

A quality battery monitor can help you track the performance and lifespan of your boat battery, providing real-time data on voltage, current, and battery health. It can also alert you to potential issues before they become more significant problems.

By following these simple tips, you can maximize the lifespan and performance of your boat battery, ensuring smooth sailing and hassle-free boating adventures for years to come.

Ensuring Smooth Sailing with a Reliable Boat Battery

As a boat owner, it is essential to have a reliable battery that can power all your onboard electrical systems. A dead or weak battery can lead to a frustrating boating experience, and in some cases, it can even be dangerous.

Therefore, it is crucial to replace your boat battery when it is no longer performing optimally. A faulty battery can put a strain on your boat’s electrical system, leading to malfunctions in other parts as well. When it comes to marine battery replacement, it is necessary to choose the right type of battery that suits your boat’s needs and size.

Boat Battery Replacement

If you notice your battery is struggling to hold a charge or see signs of corrosion, it is likely time for a boat battery replacement. The replacement process involves disconnecting the old battery, removing it from its compartment, and installing the new one in its place.

Before starting the replacement process, ensure you have the correct tools and equipment, including gloves and safety glasses. You should also carefully follow the manufacturer’s instructions and ensure proper installation to avoid any mishaps.

Marine Battery Replacement

Marine battery replacement is not a task to be taken lightly. It is essential to choose a battery with the right capacity, size, and type for your boat. Factors such as the number of onboard electrical systems, engine size, and boating habits should be considered when selecting a marine battery.

There are several types of marine batteries available, including flooded lead-acid, gel, and AGM batteries. AGM batteries are becoming increasingly popular due to their high performance, long lifespan, and maintenance-free operation. They are also spill-proof, making them ideal for boating applications where the battery may be exposed to rough waters.

Conclusion

As I conclude this expert guide on boat battery replacement, I hope the information I have shared has been valuable. With the easy steps I have provided, replacing your boat battery should be a smooth process, leaving you with a fully functioning and reliable battery.

Remember that proper maintenance and care of your boat battery are crucial to its longevity and performance. Make sure to follow the tips I have shared in this guide to keep your battery in top shape.

Summary of Key Points

  • Boat battery maintenance is essential for optimal performance and longevity.
  • Choosing the right boat battery is important to ensure optimal performance.
  • A comprehensive boat battery buying guide can help you make an informed decision.
  • Proper installation is crucial for efficient operation and safety.
  • Caring for your boat battery can extend its lifespan.
  • Knowing how to troubleshoot common boat battery issues can save you time and money.
  • Maximizing the lifespan of your boat battery can save you money in the long term.
  • Replacing your boat battery in a timely manner is important for seamless boating adventures.

By following the advice and tips in this guide, you can ensure a smooth and stress-free boat battery replacement process. With a reliable and fully functional boat battery, you can enjoy uninterrupted boating adventures.

FAQ’s

What is the best way to maintain a boat battery?

Regular maintenance is key to ensuring optimal performance of your boat battery. This includes checking and cleaning the terminals, inspecting the battery for any damage, and keeping it charged when not in use.

How often should I replace my boat battery?

The lifespan of a boat battery can vary depending on various factors such as usage, maintenance, and quality. On average, boat batteries are recommended to be replaced every 3-5 years.

Can I use a car battery in my boat?

While car batteries and boat batteries may seem similar, they are designed for different purposes. It is recommended to use a marine battery specifically designed for marine applications due to its ability to withstand the demands of boating environments.

What are the different types of boat batteries?

The most common types of boat batteries are lead-acid batteries, including flooded lead-acid batteries and sealed AGM (Absorbent Glass Mat) batteries. Each type has its advantages and considerations, so it’s important to choose the one that suits your boating needs best.

How do I know if my boat battery is fully charged?

You can use a multimeter or a battery monitor to measure the voltage of your boat battery. A fully charged battery typically reads around 12.6-12.8 volts. However, it’s important to consult your battery manufacturer’s specifications for precise measurements.

What should I do if my boat battery won’t hold a charge?

If your boat battery won’t hold a charge, it may be due to several factors such as sulfation, a faulty battery, or a parasitic drain. It is recommended to have your battery tested by a professional to determine the exact cause and take appropriate measures for repair or replacement.

How should I store my boat battery during the offseason?

When storing your boat battery during the offseason, it’s essential to keep it in a cool and dry place. Disconnect the battery cables, clean the terminals, and keep it fully charged. It’s also a good idea to use a battery maintainer or trickle charger to prevent self-discharge.

Can I jump-start my boat battery with a car?

In emergency situations, it is possible to jump-start your boat battery using a car battery. However, it’s important to follow proper safety precautions and consult your boat and battery manufacturer’s guidelines to ensure compatibility and avoid any potential damage.

What are some signs that indicate a failing boat battery?

Some common signs of a failing boat battery include slow cranking of the engine, dimming lights, a rotten egg smell, or a battery that won’t hold a charge. If you experience any of these symptoms, it’s recommended to have your battery tested and replaced if necessary.

Are there any specific precautions to take when undertaking boat battery replacement?

Yes, when installing a boat battery, it’s crucial to follow safety precautions such as wearing protective gloves and eyewear, ensuring proper polarity, and securely fastening the battery to prevent movement. It’s also important to refer to your boat and battery manufacturer’s instructions for specific installation guidelines.

What is the warranty period for boat batteries?

The warranty period for boat batteries can vary depending on the manufacturer and battery type. Typically, marine batteries come with warranties ranging from 1 to 5 years. It’s important to check the specific warranty details provided by the manufacturer.

Boat Battery Replacement Basics

As an Amazon Affiliate I earn from qualifying purchases. MarineBatteryGuide.com is a participant in the Amazon Services LLC Associates Program, an affiliate advertising program designed to provide a means for sites to earn advertising fees by advertising and linking to Amazon.com,

Links on this boat battery replacement page are sponsored affiliate links and the owner makes commission if you buy after clicking these links. The owner is not a bona-fide user of boat battery replacement. However, he has thoroughly researched marine battery replacement and provided a personal opinion only. This disclosure is in accordance with the Federal Trade Commission’s 16 CFR, Part 255: “Guides Concerning the Use of Endorsements and Testimonials in Advertising.”

Boat Battery Wiring Diagram – A Comprehensive Guide

Are you a boat owner looking to wire your boat’s batteries but don’t know where to start? Do you have some experience with boat electrical systems, but the wiring process seems daunting? Look no further! In this comprehensive boat battery wiring diagram guide, I will take you through the process of connecting your marine batteries in a hassle-free manner.

boat-battery-wiring-diagram.jpg
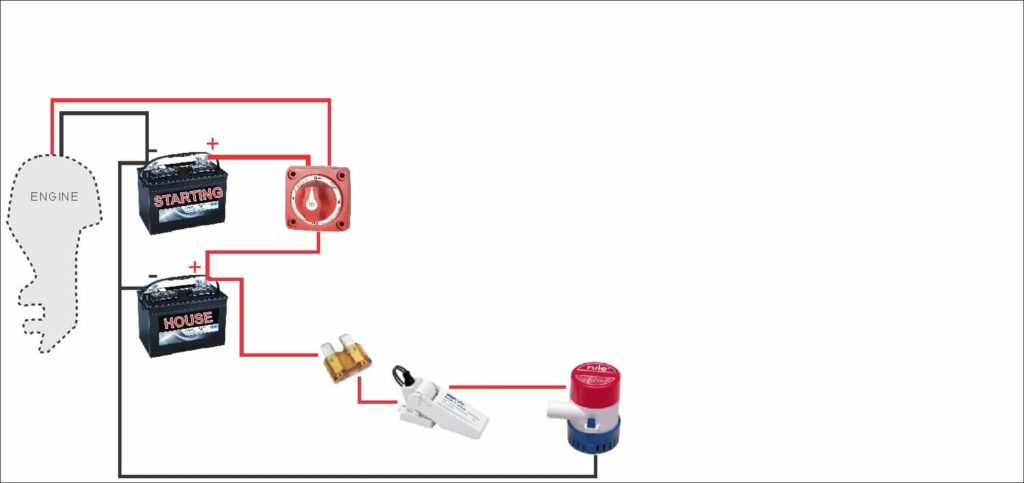
Whether you’re a beginner or have some knowledge of boat electrical systems, this guide will equip you with the knowledge you need to successfully wire your boat’s batteries. From understanding the basics of boat battery wiring to following a step-by-step guide, I will cover everything you need to know to ensure a safe and efficient electrical system on your boat.

Key Takeaways:

  • Boat battery wiring can seem overwhelming, but with the proper guidance, it can be a hassle-free process.
  • This guide covers the basics of boat battery wiring, including a boat battery switch wiring diagram and dual battery wiring diagram.
  • Using a boat battery wiring schematic can simplify troubleshooting, maintenance, and upgrades.
  • Proper battery health is crucial for the overall performance and longevity of your boat’s electrical system.
  • Adhering to safety precautions during the boat battery wiring process is essential to minimize the risk of accidents.

Understanding the Basics of Boat Battery Wiring

Before we dive into the specifics of boat battery wiring, it’s essential to have a clear understanding of the basic components and wiring diagram of a boat’s electrical system. Knowing the marine battery wiring diagram and boat electrical system diagram will help you grasp the fundamentals of boat battery wiring and make the process easier.

The boat’s electrical system consists of the battery, cables, connectors, fuse, and switch. The battery is the central component of the boat’s electrical system, and it provides power to all electrical components on the boat. The cables and connectors transfer the current between the battery and the electrical components. The fuse acts as a protective device to prevent damage to the boat’s electrical system in case of a short circuit. The switch, as we will discuss in the next section, manages the power flow between the battery and electrical components.

Marine Battery Wiring Diagram

One of the essential elements of understanding boat battery wiring is knowing the marine battery wiring diagram. A marine battery wiring diagram is a visual representation of the boat’s electrical system, showcasing the various connections between components.

The marine battery wiring diagram consists of several key elements, including the battery, cables, connectors, switch, and fuse. It also includes the electrical components that will be powered by the battery, such as the lights, radio, and other electronics. Understanding the wiring diagram can help you identify potential issues, troubleshoot problems, and ensure a safe and efficient electrical system.

Boat Electrical System Diagram

The boat electrical system diagram is another critical element in understanding boat battery wiring. This diagram provides a comprehensive overview of the boat’s electrical system, highlighting the various components and connections.

The boat electrical system diagram typically includes the battery, fuse, switch, and cables. It also includes the various electrical components on the boat, such as the lights, pumps, and electronics. The diagram may also indicate the color-coding of the wiring, helping you identify the cables and connectors used in the system.

Having a clear understanding of the marine battery wiring diagram and boat electrical system diagram is essential before starting the boat battery wiring process. In the next section, we will discuss the boat battery switch wiring diagram and its importance in managing the power flow between the battery and electrical components.

Boat Battery Switch Wiring Diagram and Its Importance

Understanding the boat battery switch wiring diagram is critical for managing your boat’s power supply effectively and ensuring the safety of the electrical system. The boat battery switch is a crucial component that allows you to control the power flow between your boat’s batteries and the various electrical components, such as lights, radios, and navigational equipment.

The diagram below shows a typical boat battery switch wiring diagram:

Label Connection
Battery 1 Positive (+) Terminal
Battery 2 Positive (+) Terminal
Common Positive (+) Terminal
Accessory Positive (+) Terminal
Ground Negative (-) Terminal

This diagram shows how the boat battery switch connects the batteries and the accessory equipment. Battery 1 and Battery 2 connect to the common terminal, which splits the power supply between them. The accessory terminal connects to the various electrical components on the boat, and the ground terminal connects to the boat’s ground system.

Understanding this diagram and ensuring that your boat’s battery switch wiring follows it is crucial for several reasons. Firstly, it allows you to manage the power flow between your boat’s batteries effectively, which is essential for maintaining battery health and prolonging their lifespan. Secondly, it ensures that the boat’s electrical equipment receives the correct power supply, preventing damage or malfunction. Finally, following the boat battery switch wiring diagram is crucial for safety, reducing the risk of electrical hazards such as short circuits, overheating, or fires.

In addition to following the boat battery switch wiring diagram, it’s essential to choose the right type of switch for your boat. There are several types of boat battery switches available, such as single-pole, double-pole, and selector switches, each with their specific functions and features. Choosing the right switch for your boat’s electrical setup is crucial for ensuring optimal performance, reliability, and safety.

Dual Battery Wiring Diagram for Your Boat

Dual batteries are an excellent way to ensure that your boat has sufficient power to run multiple electrical components without the risk of draining a single battery. The dual battery wiring diagram for your boat involves connecting the batteries in parallel or series, depending on your preference.

Parallel Wiring

Parallel wiring involves connecting the positive terminals of both batteries together and connecting the negative terminals together as well. This wiring setup ensures that both batteries provide equal voltage, thereby delivering a longer lifespan and more consistent power supply to your boat’s electrical components.

Note: When connecting the batteries in parallel, the total voltage remains the same, while the amp hour capacity doubles.

Series Wiring

Series wiring involves connecting the positive terminal of one battery to the negative terminal of the other battery, and then connecting the remaining positive and negative terminals to your boat’s electrical components. This setup delivers twice the voltage but the same amp hour capacity as a single battery.

Note: When connecting the batteries in series, the total voltage doubles, while the amp hour capacity remains the same.

Connection Voltage Amp Hour Capacity
Parallel Same as single battery Doubles
Series Doubles Same as single battery

To make the dual battery wiring diagram work optimally, you’ll need a few additional components such as battery isolators, switches, and fuses. The battery isolator ensures that the two batteries charge independently, preventing power from draining from one battery to the other. The fuses protect your boat’s electrical components against power surges and prevent electrical fires.

Wiring your boat’s batteries in a dual configuration may seem daunting, but with the right tools and knowledge, the process can be straightforward. Ensure that you follow safety protocols and use proper tools when working on your boat’s electrical components.

Boat Battery Wiring Schematic and Its Benefits

Using a boat battery wiring schematic is a crucial step towards a safe and efficient electrical system setup. It acts as a visual representation of the electrical connections within your boat, making it easier to troubleshoot, maintain, and upgrade. In this section, I will highlight the benefits of using a boat battery wiring schematic and how it simplifies the overall boat battery wiring process.

Why use a boat battery wiring schematic?

Boat battery wiring requires proper planning to ensure the optimal operation of your boat’s electrical system. Using a boat battery wiring schematic helps you create a clear visual representation of the connections between the boat’s electrical components and the batteries. This visual representation helps you understand the electrical system’s flow and the battery’s function before you begin wiring.

The schematic makes it easier to troubleshoot issues that may arise with your boat’s electrical system. Compared to just following a physical wiring setup, the schematic allows you to pinpoint the origin of the problem and quickly repair it.

Creating a boat battery wiring schematic

Creating a boat battery wiring schematic is not as complicated as it may seem. The schematic should include all the components of your boat’s electrical system. It is important to note that there are different wiring schematics for different boat types. It would be best if you created a wiring schematic that corresponds to your boat’s type.

You can create a wiring schematic either manually on paper or using computer software that allows you to draw schematics. It’s essential to ensure the schematic is clear and easy to read.

Visual Guide

The image above is an example of what a boat battery wiring schematic may look like. Notice the clear labeling of each component, the flow of the wiring, and the use of colors to make it easier to understand. A boat battery wiring schematic provides a clear visual representation of the electrical connections and ensures a safe and efficient boat electrical system.

Essential Tools and Materials for Boat Battery Wiring

Effective boat battery wiring requires the right tools and materials to ensure a solid and reliable wiring setup. Here’s a list of essential items you’ll need for your boat battery wiring project:

Tools

  • Wire Cutters: These are necessary for neatly cutting wires to the desired length.
  • Wire Strippers: These are essential for stripping insulation from the wires without damaging the copper strands.
  • Ring Terminals: These are used to connect wires to the battery and other components.
  • Heat Shrink Tubing: These are used to protect wire connections and prevent moisture from building up.
  • Butt Connectors: These are used to splice two wires together.
  • Crimping Tool: This is used to crimp the ring terminal and butt connector ends of the wires.
  • Fuse Holder: To protect your boat’s electrical system, it is important to use a fuse holder in case of a power surge.
  • Multi-Meter: This is used to test the voltage, amperage, and continuity of the electrical connections. It is also used to detect short circuits and other electrical malfunctions.
  • Marine Electrical Wiring Diagram: This is used to maintain a clear understanding of your boat’s electrical system and to ensure a safe and efficient wiring setup.

Materials

Here are the materials required for successful boat battery wiring:

Materials Description
Battery Cables These cables connect the batteries to the boat’s electrical system. They come in various lengths and sizes, so choose the appropriate size based on your boat’s requirements.
Battery Switch The battery switch is used to manage the power flow between batteries and various electrical components on your boat.
Battery Charger The battery charger is an essential tool for charging your boat’s batteries. Choose a charger that meets your boat’s voltage and amperage requirements.
Battery Box The battery box provides a secure and safe place to store your boat’s batteries.
Battery Choose high-quality marine batteries that are designed to withstand the harsh marine environment.

Using the right tools and materials is essential for a successful boat battery wiring project. By following the appropriate steps and using the right equipment, you can ensure a safe and efficient electrical system for your boat.

Step-by-Step Guide to Wiring Your Boat Batteries

Now that we’ve covered the basic components and wiring diagram of a boat’s electrical system, let’s dive into the step-by-step process of wiring your boat batteries. Before we begin, make sure you have all the necessary tools and materials from our previous section, “Essential Tools and Materials for Boat Battery Wiring.”

Step 1: Planning the Layout

Begin by deciding on the placement of your batteries. The location should be dry, secure, and easily accessible for maintenance. Ensure there is enough space to accommodate the batteries and any necessary wiring. Consult the manufacturer’s recommendations for the best placement options for your specific batteries.

Step 2: Install Bus Bars and Wires

Install bus bars and wiring in accordance with your boat’s electrical system diagram. Use appropriately sized wires and ensure connections are tight and secure.

Step 3: Connect Positive Wires

Connect the positive wires to the respective positive terminals of each battery. Use appropriately sized terminals and ensure connections are tight and secure.

Step 4: Connect Negative Wires

Connect the negative wires to the respective negative terminals of each battery. Use appropriately sized terminals and ensure connections are tight and secure.

Step 5: Install Battery Switches

If you have a battery switch, install it in the designated location and connect the wiring in accordance with the boat battery switch wiring diagram. Ensure connections are tight and secure.

Step 6: Test the System

After completing the wiring, test the system to ensure everything is functioning correctly. Use a multimeter to check voltage levels and ensure proper power flow.

Following these steps will ensure a successful boat battery wiring installation. If you encounter any issues, refer to our troubleshooting and maintenance tips in the following section.

Safety Precautions for Boat Battery Wiring

Boat battery wiring involves dealing with electrical currents, making safety a top priority. To prevent accidents and protect yourself and your boat, follow these essential safety precautions during the boat battery wiring process:

Turn Off the Power

Prior to starting any boat battery wiring, it’s essential to turn off the power supply and disconnect the battery. This ensures that you won’t accidentally come into contact with live wires and avoids the risk of electrocution.

Wear Protective Gear

Wearing protective gear is crucial when performing boat battery wiring. Always wear non-conductive gloves, safety goggles, and protective clothing to avoid electrocution or injury from sharp edges or hot surfaces.

Disconnect the Negative Terminal First

When removing a battery from your boat, always disconnect the negative terminal first. This avoids any potential electrical shorts or sparks that may result from accidental contact with metal objects.

Label All Connections

Proper labeling of all connections is essential to prevent confusion and ensure easy troubleshooting later. Always label each wire and connection point with the corresponding terminal name or number.

Avoid Mixing Battery Types

It is important to avoid mixing battery types or using batteries of varying ages, as this can result in an uneven load distribution and may damage your boat’s electrical system. Always use the same type and age of batteries when connecting them in parallel or in series.

Use Proper Wiring Materials

Using the correct wiring materials is essential to ensure a safe and reliable boat battery wiring setup. Marine-grade wires and connections made from materials such as copper and tin are recommended for optimal conductivity and durability.

Test the Connections

Before turning on the power, it’s important to test the battery connections and ensure that all wires are correctly attached. Use a voltmeter to test the voltage across each positive and negative terminal to verify that there is no voltage drop.

Never Modify or Alter Electrical Components

Modifying or altering any electrical components without proper knowledge and experience can be dangerous and should be avoided. Seek professional assistance if you require any modifications or upgrades to your boat’s electrical system.

By adhering to these essential safety precautions, you can minimize the risk of accidents and protect yourself and your boat from potential electrical hazards.

Troubleshooting and Maintenance Tips for Boat Battery Wiring

Despite following the boat battery wiring diagram and installation process correctly, issues may still arise with your boat’s electrical system. Identifying the root cause of electrical problems can be a challenging task, but with the right guidance, you can troubleshoot effectively and maintain your boat’s electrical system in optimal condition.

Common Problems with Boat Battery Wiring

Here are some common issues that boat owners face with their battery wiring:

Problem Cause Solution
Dead Battery Over-discharging of battery, Poor battery maintenance Charge battery, Perform regular battery maintenance
Low Voltage Loose connections, Corrosion, Undercharging of battery Check connections, Remove corrosion, Charge battery
Blown Fuse Short circuit, Overloading of circuit, Faulty component Identify and fix short circuit, Replace fuse, Inspect and replace faulty component

By understanding the common problems and their solutions, you can diagnose and address issues with your boat’s electrical system more efficiently.

Maintenance Tips for Boat Battery Wiring

Regular maintenance of your boat’s electrical system can help you detect problems before they escalate and ensure that your boat operates smoothly and safely. Here are some essential maintenance tips:

  • Regularly inspect the battery terminals and wiring for signs of corrosion or damage and clean them as needed.
  • Charge the batteries regularly and avoid over-discharging them.
  • Perform routine checks on the battery terminals and wiring, especially before and after boat trips.
  • Inspect all electrical components, including switches, fuses, and wires, for any signs of damage, wear, or corrosion.
  • Replace or repair faulty components as soon as they are detected.

Upgrading Your Boat Battery Wiring System

If your boat’s electrical system needs an upgrade, make sure to plan and execute it carefully. Here are some tips for upgrading your boat battery wiring:

  • Identify the components that need upgrading and evaluate the current battery wiring setup.
  • Ensure that any upgrades comply with legal and safety regulations.
  • Plan the wiring layout for the new components and ensure that it allows for easy access and maintenance.
  • Choose high-quality components that are compatible with your boat’s electrical system.
  • Work with a professional if you are unsure about the wiring process or do not have sufficient knowledge or experience.

By following these tips, you can maintain and upgrade your boat’s electrical system effectively, ensuring that it performs reliably and safely.

Upgrading Your Boat Battery Wiring System

If you’re looking to upgrade your boat’s electrical system or add new components, modifying your boat battery wiring is essential. After evaluating your boat’s power requirements and existing electrical system, follow these steps to upgrade your boat battery wiring system.

Step 1: Plan Your Layout

Before starting the upgrade process, create a detailed plan of your desired layout. Ensure that all the components are located in ideal positions for optimal performance and minimal interference with other onboard systems. Identify the length of wire and the necessary gauge to accommodate the power load.

Step 2: Gather the Tools and Materials

Gather the essential tools and materials needed for the upgrade. These include marine-grade wires, crimping tools, cable ties, heat shrink tubing, and a multimeter for testing and troubleshooting.

Step 3: Disconnect the Existing Wiring

Before removing any wiring, ensure that you have disconnected all the power sources. Remove the existing wiring and label it properly for future reference.

Step 4: Install the New Wiring

Following your layout plan, install the new wiring using the appropriate cable ties and heat shrink tubing. Use marine-grade wires with the correct gauge for the power load to minimize voltage drops and overheating.

Wire Gauge Max Ampacity Capacity
8 70
6 90
4 110
2 170

Step 5: Install New Battery Switches and Connectors

Install new battery switches and connectors that match the layout plan, ensuring they are securely connected and grounded. Use crimping tools to create strong connections that will not come loose over time. Check all connections using a multimeter to ensure they are within the recommended voltage range.

Step 6: Test the Electrical System

Testing is crucial to ensure that the new wiring system is functioning correctly. Test the battery voltage, amperage, and individual component functionality using a multimeter. Ensure that all the switches and connections are functioning correctly before launching.

Upgrading your boat battery wiring can be complex, but with careful planning and attention to detail, it’s possible to achieve a safe and efficient electrical system. Take your time and don’t rush the process, and always prioritize safety when working with electricity.

Tips for Maintaining Proper Battery Health

Proper battery health is vital for the long-term performance and reliability of your boat’s electrical system. Here are some tips to help you maintain optimal battery health:

  • Charge regularly: Be sure to charge your batteries regularly, even if you haven’t used them. Letting your batteries sit for extended periods without a charge can cause irreversible damage.
  • Use the right charger: Using the wrong charger can also damage your batteries. Make sure you use a charger that’s compatible with your battery type and follow the manufacturer’s instructions.
  • Inspect regularly: Inspect your batteries regularly for signs of damage, such as cracks, leaks, or bulges. If you notice any issues, replace the battery immediately.
  • Store properly: When not in use, store your batteries in a cool, dry place away from direct sunlight and moisture. Avoid storing them on concrete floors, as this can cause discharge.
  • Maintain connections: Regularly check and clean the battery connections to prevent corrosion and ensure a strong connection.
  • Follow maintenance routines: Follow the manufacturer’s recommended maintenance routines, such as adding water to lead-acid batteries when necessary or equalizing the charge across multiple batteries.

By following these tips, you can ensure that your boat’s batteries remain in optimal condition and provide you with reliable performance for years to come.

Conclusion

As a professional copywriting journalist, I understand the importance of mastering boat battery wiring for any boat owner. With the knowledge provided in this comprehensive guide, you now have the tools to confidently wire your boat’s batteries in a safe and efficient manner.

Taking Control of Your Boat Electrical System

By understanding the basic components and wiring diagram of your boat’s electrical system, you can take control of your boat’s power flow. The boat battery switch wiring diagram and dual battery wiring diagram are vital components in ensuring the reliability and safety of your boat’s electrical system.

Implementing Best Practices for Safety and Maintenance

Adhering to essential safety precautions during the boat battery wiring process is critical to minimizing the risk of accidents and electrical hazards. Additionally, implementing regular maintenance and charging practices can help ensure proper battery health and optimal performance of your boat’s electrical system.

Continuous Improvement of Your Boat Electrical System

Upgrading and modifying your boat battery wiring system can enhance the functionality and reliability of your boat’s electrical system, allowing for the addition of new components and features.

With the guidance provided in this guide, you can take the necessary steps to empower yourself with a better understanding of boat battery wiring, ensuring smooth sailing on the water.

FAQ’s

What is boat battery wiring?

Boat battery wiring refers to the process of connecting marine batteries in a boat’s electrical system to ensure proper power distribution and functionality.

Why is boat battery wiring important?

Boat battery wiring is crucial for a reliable and efficient electrical system on your boat. It ensures proper power supply to various components, allowing them to function optimally.

Can I wire my boat’s batteries myself?

Yes, you can wire your boat’s batteries yourself by following proper guidelines and safety precautions. However, if you’re unsure, it’s recommended to seek professional assistance.

How many batteries do I need for my boat?

The number of batteries required for your boat depends on your power needs and the electrical components you have onboard. It’s recommended to consult a professional to determine the ideal battery setup for your boat.

What is a boat battery switch, and why is it important?

A boat battery switch is a device that allows you to control the power flow between batteries and electrical components on your boat. It is important for managing power distribution, isolating batteries, and ensuring safety.

How do I wire a dual battery setup in my boat?

Wiring a dual battery setup in your boat involves connecting two batteries in parallel or series, depending on the desired power configuration. It’s crucial to follow proper wiring diagrams and precautions for a successful dual battery installation.

What are the benefits of using a boat battery wiring schematic?

Using a boat battery wiring schematic provides a visual representation of the electrical connections in your boat. It simplifies troubleshooting, maintenance, and upgrades by allowing you to easily identify and understand the wiring setup.

What tools and materials do I need for boat battery wiring?

Essential tools and materials for boat battery wiring include wire strippers, crimping tools, marine-grade wires, battery connectors, fuses, circuit breakers, and a multimeter. It’s important to use proper marine electrical wiring diagrams for guidance.

What are some safety precautions for boat battery wiring?

Safety is paramount when working with boat battery wiring. Some important precautions include wearing protective gear, disconnecting power sources, avoiding short circuits, securing connections, and following manufacturer instructions.

How can I troubleshoot and maintain my boat battery wiring?

To troubleshoot and maintain your boat battery wiring, regularly inspect connections, test battery voltage, clean terminals, and address any wiring issues promptly. Additionally, following proper charging practices and battery maintenance routines is essential.

How do I upgrade my boat battery wiring system?

To upgrade your boat battery wiring system, evaluate your power needs, plan the new wiring layout, and make the necessary connections. It’s important to consider the compatibility of new components and consult professionals if needed.

How can I maintain proper battery health in my boat?

Maintaining proper battery health involves regular charging, avoiding deep discharges, keeping batteries clean and dry, inspecting for corrosion, and following manufacturer recommendations for maintenance and storage.

How To Wire (or re-wire) a boat

As an Amazon Affiliate I earn from qualifying purchases. MarineBatteryGuide.com is a participant in the Amazon Services LLC Associates Program, an affiliate advertising program designed to provide a means for sites to earn advertising fees by advertising and linking to Amazon.com,

Links on this boat battery wiring page are sponsored affiliate links and the owner makes commission if you buy after clicking these links. The owner is not a bona-fide user of boat battery wiring. However, he has thoroughly researched marine battery wiring and provided a personal opinion only. This disclosure is in accordance with the Federal Trade Commission’s 16 CFR, Part 255: “Guides Concerning the Use of Endorsements and Testimonials in Advertising.”

Marine Battery Care for Reliable Power

Welcome to the ultimate guide on marine battery care. As a boat owner, you know how crucial it is to have a reliable power source for your vessel. Proper care and maintenance of your boat battery will not only ensure smooth operations but also extend its lifespan, saving you money and the hassle of frequent replacements.

marine-battery-care-guide.jpg

An investment of $27.00 for a solid marine battery maintenance and servicing program is a small price to pay for battery peace of mind

In this guide, I will provide expert tips on how to care for and maintain your boat battery. We will cover everything from selecting the right battery to regular inspection and cleaning, charging, off-season storage, and troubleshooting common issues. By the end of this guide, you will be equipped with the knowledge and tools to keep your boat battery in top shape.

The Marine Battery Guide

Marine Battery Care Key Takeaways

  • Proper maintenance and marine battery care to ensure reliable performance and longevity.
  • Selecting the right boat battery is crucial for optimal performance.
  • Regular inspection and cleaning are vital for prolonging the life of your boat battery.
  • Proper charging and off-season storage are essential for maintaining your boat battery.
  • Knowing when and how to replace your boat battery is crucial for avoiding disruptions in your boating experience.

Understanding Boat Batteries: Types and Components

Before diving into the specific care and maintenance procedures, it’s essential to understand the different types of boat batteries and their components. Proper knowledge of boat batteries is crucial for ensuring their longevity and efficient operation. Here, I’ll provide an overview of the most common types of boat batteries and their components, helping you make informed decisions when it comes to maintaining your boat battery.

Types of Boat Batteries

There are three main types of batteries used in boating: flooded lead-acid batteries, sealed lead-acid batteries, and lithium-ion batteries.

  1. Flooded lead-acid batteries are the most common type of marine batteries. They contain lead plates submerged in an electrolyte solution, which requires regular maintenance and monitoring of fluid levels to prevent overcharging or undercharging. These batteries can be challenging to install due to their weight and require adequate ventilation because they emit gas during charging.
  2. Sealed lead-acid batteries offer a maintenance-free solution as they don’t require fluid top-up. They are also safer than flooded lead-acid batteries because they don’t emit gas, making them ideal for smaller boats or vessels with insufficient ventilation. However, they have a shorter lifespan than flooded lead-acid batteries and can’t withstand deep discharge cycles.
  3. Lithium-ion batteries are the newest, most advanced, and expensive type of marine batteries. They provide higher performance and longer lifespan, are lightweight, and have no maintenance requirements. They can withstand deep discharge cycles, but they require a specialized charging system and have a high initial cost.


Components of Boat Batteries

Regardless of the type, all boat batteries have the same basic components:

Component Function
Positive and Negative Terminals The terminals are the points where electrical current enters and exits the battery.
Electrolyte Solution The solution is a mixture of sulfuric acid and water that facilitates the flow of electrical current between the battery plates.
Lead Plates The plates are the source of the electrical current and are made of lead and lead oxide.
Separator The separator is a thin layer of insulating material that separates the positive and negative plates while allowing the electrolyte solution to flow between them.
Battery Case The battery case protects the components and holds the electrolyte solution and plates in place.
Vent Caps Vent caps allow for the release of gas produced during the charging process, preventing the battery from exploding.

Choosing the Right Boat Battery

When it comes to marine battery care and maintenance, selecting the right battery is as important as proper maintenance. Choosing the right battery for your boat depends on several factors, including:

  • The size and type of your boat
  • The amount of electrical power required
  • Your budget

The two types of batteries commonly used in boats are lead-acid batteries and AGM (Absorbent Glass Mat) batteries. Lead-acid batteries are the most affordable option, but they require regular maintenance to check water levels and prevent damage from overcharging. On the other hand, AGM batteries are maintenance-free, have a longer lifespan, and can handle a higher discharge rate without damage, making them ideal for high-performance boats.

When choosing a boat battery, be sure to consider compatibility with your boat’s electrical system. Consult the manufacturer’s recommendations and your boat’s owner’s manual to ensure you purchase a battery with the correct voltage and amperage for your system.

Lastly, when it comes to marine battery care and maintenance best practices, it’s essential to ensure that your battery is stored in a cool, dry, and well-ventilated location. Exposure to heat, humidity, or corrosive materials can damage the battery and reduce its lifespan.

The Marine Battery Guide

Boat Battery Installation and Safety Measures

Proper installation and safety precautions are crucial for the efficient operation and longevity of your boat battery. Here’s a marine battery care checklist of the necessary steps and precautions to follow during installation:

  1. Choose the right location: Select a location for the battery that is easily accessible for maintenance and monitoring. Ensure there is enough space and ventilation to prevent overheating.
  2. Secure the battery: Use a battery box or tie-downs to secure the battery firmly in place. Secure any loose cables leading to the battery.
  3. Prevent cable damage: Use cable clamps or ties to prevent the cables from rubbing against sharp edges or other cables. This helps to prevent cable damage and prolong the life of the battery.
  4. Connect the cables: Connect the positive cable first, followed by the negative cable. Ensure the cables are tightened securely and coated with a corrosion inhibitor.
  5. Label the cables: Label the positive and negative cables to prevent confusion during maintenance or replacement.
  6. Install a fuse: Install a fuse on the positive cable to prevent damage in case of a short circuit.
  7. Conduct a safety check: Before starting the boat, conduct a safety check to ensure there are no loose connections or damaged cables. Check the battery terminals for corrosion and clean them if necessary.

Following these steps will ensure a safe and efficient installation. Remember to always wear protective gloves and eyewear when handling the battery, as battery acid can cause severe burns and chemical burns to the eyes.

Regular Inspection and Cleaning

To ensure the optimal performance and longevity of your boat battery, regular inspection and cleaning are crucial maintenance steps. Here are some boat battery maintenance tips for longevity:

Inspection

Regularly inspecting your boat battery can help detect issues early on and prevent potential problems. Check the battery terminals and cables for signs of corrosion, loose connections, or damage. Also, inspect the battery case for cracks or other damage.

If you notice any signs of damage, it’s essential to address the issue before it worsens. Tighten loose connections, remove corrosion using a wire brush, and replace the battery case if necessary.

Cleaning

Proper cleaning of your boat battery can remove dirt, grime, and other debris that can hinder its performance. Use a solution of baking soda and water to clean the battery terminals and cables. Dip a wire brush in the solution and scrub away any corrosion or build-up.

After cleaning, rinse the battery with water and dry it thoroughly before reconnecting the cables. This will help prevent any damage to the battery and ensure a secure connection between the terminals and cables.

Remember to wear gloves and safety goggles while performing any boat battery maintenance to avoid injury or exposure to harmful chemicals.

The Marine Battery Guide

Charging Boat Batteries: Best Practices

When it comes to maintaining boat batteries, proper charging is critical for longevity and optimal performance. Follow these best practices for safely and efficiently charging your boat battery:

  1. Use a Smart Charger: Invest in a smart charger that can monitor and adjust the charging process automatically. Smart chargers help prevent overcharging, which can damage the battery, and undercharging, which can lead to sulfation.
  2. Avoid Fast Charging: While it may be tempting to try and charge your battery quickly, fast charging can cause overheating and damage the battery. Stick to a slow and steady charging process for the best results.
  3. Charge Regularly: It’s essential to keep your battery charged, even during the off-season. Regular charging helps prevent sulfation and ensures the battery is ready when you need it.
  4. Disconnect When Fully Charged: When the battery is fully charged, disconnect it from the charger. Leaving the battery connected to the charger can cause overcharging and damage the battery.
  5. Avoid Charging in Extreme Temperatures: Extreme temperatures can damage the battery and reduce its lifespan. Avoid charging the battery in temperatures below freezing or above 120°F.

Using a Battery Monitor

Another helpful tool for monitoring your battery’s charge is a battery monitor. Battery monitors provide real-time information on the battery’s voltage, current, and state of charge, helping you ensure the battery is performing optimally.

By following these best practices and utilizing a smart charger and battery monitor, you can keep your boat battery charged and in top condition for all your boating adventures.

Storing Boat Batteries: Off-Season Care

Proper storage of boat batteries during the off-season is crucial to prolong their lifespan and avoid potential damage. Here are the recommended steps for safely storing your boat batteries:

  1. Clean the battery: Before storing, make sure to clean the battery thoroughly to remove any dirt or debris. Use a solution of baking soda and water to neutralize any acid and prevent corrosion.
  2. Disconnect the battery: It’s essential to disconnect the battery from the boat’s electrical system to avoid any drain during storage. Remove the negative cable first, followed by the positive cable.
  3. Check the charge: Ensure the battery is fully charged before storing to prevent sulfation. If needed, charge the battery using a smart charger to avoid overcharging or undercharging.
  4. Store in a cool, dry place: Store the battery in a cool, dry place away from direct sunlight and other heat sources. Avoid locations with extreme temperatures or humidity, as these can damage the battery.
  5. Regular maintenance: During storage, it’s essential to regularly check the battery’s charge level and perform maintenance as needed. This includes charging the battery if the voltage drops below a certain level and cleaning any corrosion or dirt.

By following these tips, you can ensure your boat batteries are in top condition when it’s time to hit the water again. Proper storage and maintenance are essential for maximizing your battery’s lifespan and performance.

Troubleshooting Common Battery Issues

Even with proper care and maintenance, boat batteries may encounter issues that can cause problems ranging from minor inconveniences to major safety hazards. Below are some common issues that boaters may face and tips for troubleshooting them.

Battery Corrosion

Corrosion can form on battery terminals and cables, hindering the flow of electrical current and leading to poor battery performance. To prevent this issue, it’s essential to keep the battery and its connections clean and dry. Regularly inspect the terminals and cables, and if you notice any buildup, clean them with a solution of baking soda and water. Apply a thin layer of petroleum jelly to the terminals afterward to prevent future corrosion.

Low Voltage

If your boat battery has low voltage, it may not have enough power to start the engine or operate onboard electronics. The most common cause of low voltage is leaving the key in the “on” position or operating electronics without the engine running. To avoid this issue, always turn the key off when you’re not using the engine, and limit the use of electronics when the engine isn’t running. If you do encounter low voltage, recharge the battery with a smart charger, making sure to follow the manufacturer’s instructions.

Sulfation

Sulfation is a buildup of lead sulfate on the battery plates, which reduces the battery’s capacity and lifespan. To prevent this issue, it’s essential to maintain a proper charge level and avoid overcharging. If you notice signs of sulfation, such as a slow engine crank or dimming lights, try desulfating the battery using a specialized charger or additive.

Other Issues

Other common battery issues include loose cables, damaged battery cases, and internal shorts. If you encounter any of these issues, stop using the battery immediately and consult a professional for repairs or replacement. Remember that attempting to fix a battery yourself can be dangerous and may cause further damage or injury.

“Proper care and maintenance are essential for reliable performance and longevity. By staying proactive in your battery care routines and addressing any issues promptly, you can enjoy a worry-free boating experience while maximizing the lifespan of your boat’s power source.”

Battery Replacement: When and How to Do It

Like all things mechanical, boat batteries have a lifespan. As they age, they become less reliable, and their capacity for holding a charge diminishes. When this happens, it’s time to replace your battery.

The question is, how do you know when it’s time?

There are a few signs to watch out for that will let you know when it’s time to replace your boat battery:

  • Age: Boat batteries typically last between 3-5 years. If your battery is within that range, it may be time to consider a replacement.
  • Difficulty starting: If you’re having a hard time starting your boat, it may be a sign that your battery isn’t holding a charge well enough to turn the engine over.
  • Low voltage: If your battery voltage is consistently low, it may be time to replace it.

If you notice any of these signs, it’s time to start thinking about replacing your boat battery.

When it comes time to replace your battery, it’s important to follow a few best practices to ensure a smooth process.

  1. Choose the right battery: When selecting a new battery, make sure to choose one that is appropriate for your boat’s electrical system.
  2. Remove the old battery: Before installing a new battery, you’ll need to remove the old one. Be sure to dispose of it properly according to local laws and regulations.
  3. Clean the battery holder: Before installing the new battery, clean the battery holder to ensure a good connection.
  4. Install the new battery: Install the new battery, being careful to connect the positive and negative terminals correctly.
  5. Test the new battery: Before hitting the water, test the new battery to ensure that everything is working correctly.

By following these best practices, you can ensure a smooth and successful battery replacement process.

Maintaining boat batteries properly is critical to ensure their longevity and optimal performance. By following the tips outlined in this guide, you can keep your boat’s power source in top condition, ensuring reliability and longevity for seasons to come.

Enhancing Battery Performance and Longevity

Proper boat battery care and maintenance are vital for ensuring optimal performance and longevity. However, there are additional steps you can take to further enhance the lifespan of your boat battery and improve its overall performance.

Invest in a Battery Charger

One way to enhance your battery’s performance is by investing in a high-quality battery charger. A good charger can help maintain your battery’s charge and prevent overcharging or undercharging, which can significantly impact its lifespan.

When selecting a charger, choose one that is compatible with your boat battery type and size and provides the required voltage. A smart charger that automatically adjusts the charge rate based on your battery’s state of charge is an ideal option.

Use Quality Battery Cables

The quality of your battery cables can also impact the performance and lifespan of your boat battery. Corroded or poorly connected cables can lead to voltage drops and prevent your battery from delivering its full power potential.

Ensure that your battery cables are in good condition, free from corrosion and damage, and correctly sized for your battery and electrical system’s requirements. Using marine-grade tinned copper cables is recommended, as they offer superior corrosion resistance and durability.

Implement Battery Maintenance Practices

In addition to regular inspection and cleaning, implementing some best practices can also help enhance your battery’s performance and lifespan. For example, avoiding deep discharges, maintaining proper water levels in flooded lead-acid batteries, and disconnecting your battery when not in use can all help prevent damage and extend its lifespan.

Monitor Your Battery’s Health

Regularly monitoring your battery’s health can also help you identify and address potential issues before they become significant problems. Using a battery monitor with features such as voltage and temperature sensing can provide valuable insights into your battery’s condition and alert you to any issues immediately.

Conclusion

In conclusion, caring for your boat battery is an essential aspect of boating. As a boat owner, it’s your responsibility to ensure that your vessel’s power source is in top condition. By following the advice outlined in this guide, you can maintain your boat battery’s performance and extend its lifespan.

Stay Proactive

Remember that boat battery care is an ongoing process. Don’t wait until something goes wrong to take action. Regular inspections, cleanings, and preventative maintenance can often prevent issues before they occur.

Follow Best Practices

When caring for your boat battery, it’s essential to follow best practices. From choosing the right battery to proper installation, charging, and storage techniques, each step should be done with care and attention.

Maximize Potential

Finally, with the right care and maintenance, you can maximize your boat battery’s potential. From enhancing performance to extending lifespan, there are many things you can do to ensure that your boat battery is running at its best.

By staying proactive, following best practices, and maximizing potential, you can enjoy a worry-free boating experience while ensuring your vessel’s power source is always in top condition. Thank you for reading this comprehensive guide on boat battery care and maintenance. Happy boating!

Marine Battery Maintenance – What you Need to Know

Marine Battery Care FAQ’s

What are the essential tips for boat battery care and maintenance?

To ensure peak performance and longevity for your boat’s battery, it is important to follow these essential tips: – Regularly inspect and clean the battery terminals and connections – Keep the battery fully charged when not in use – Avoid overcharging or undercharging the battery – Store the battery in a cool and dry place during the off-season

What are the different types of boat batteries?

There are several types of boat batteries, including: – Lead-acid batteries: These are the most common type and are known for their affordability and reliability. – AGM batteries: These are sealed batteries that provide superior performance and are maintenance-free. – Gel batteries: These batteries use a gel electrolyte and are well-suited for deep cycle applications.

How do I choose the right boat battery?

When choosing a boat battery, consider the following factors: – Determine the battery type that best suits your needs (lead-acid, AGM, gel) – Calculate the required battery capacity based on your electrical demands – Ensure compatibility with your boat’s electrical system – Check the manufacturer’s recommendations and warranty

What safety measures should I follow during boat battery installation?

When installing a boat battery, it is important to follow these safety measures: – Wear protective gloves and safety glasses – Ensure the boat’s electrical system is turned off – Disconnect the negative terminal first when removing the old battery – Connect the positive terminal first when installing the new battery – Avoid any sparks or open flames near the battery

How often should I inspect and clean my boat battery?

It is recommended to inspect and clean your boat battery at least once every three months or more frequently if you notice any signs of corrosion or dirt buildup. Regular cleaning and inspection help maintain optimal performance and prevent potential issues.

What are the best practices for charging boat batteries?

To ensure proper charging, follow these best practices: – Use a smart charger designed for marine batteries – Charge at the appropriate voltage and current levels – Avoid overcharging or undercharging – Monitor the charging process and disconnect when the battery reaches full capacity

How should I store my boat batteries during the off-season?

When storing boat batteries during the off-season, follow these steps: – Clean the battery terminals and connections – Fully charge the battery before storage – Store the battery in a cool and dry place – Disconnect the battery cables to prevent any drainage or corrosion

What are common marine battery care issues and how can I troubleshoot them?

Common battery issues include corrosion, low voltage, and sulfation. To troubleshoot these issues: – Clean corrosion from the battery terminals and connections – Use a battery tester to check the voltage and recharge if necessary – Use a desulfator or desulfation charger to remove sulfation buildup

When should I replace my boat battery and how should I do it?

You should consider replacing your boat battery if it shows signs of failing, such as reduced capacity or inability to hold a charge. To replace the battery: – Ensure the boat’s electrical system is turned off – Disconnect the negative terminal first when removing the old battery – Connect the positive terminal first when installing the new battery – Follow the manufacturer’s instructions for proper installation

How can I enhance the performance and longevity of my boat battery?

To maximize your boat battery’s potential, consider these marine battery care tips: – Avoid deep discharges by recharging the battery regularly – Keep the battery clean and free from corrosion – Use a battery maintainer or trickle charger during periods of inactivity – Consider adding a battery monitor to track the battery’s state of charge.

Boat Maintenance and Service Schedule is Critical

As an Amazon Affiliate I earn from qualifying purchases. MarineBatteryGuide.com is a participant in the Amazon Services LLC Associates Program, an affiliate advertising program designed to provide a means for sites to earn advertising fees by advertising and linking to Amazon.com.

Links on this marine battery care page are sponsored affiliate links and the owner makes commission if you buy after clicking these links. The owner is not a bona-fide user of marine battery care and maintenance . However, he has thoroughly researched marine battery care and provided a personal opinion only. This disclosure is in accordance with the Federal Trade Commission’s 16 CFR, Part 255: “Guides Concerning the Use of Endorsements and Testimonials in Advertising.”